In our last post, Alex Park from AuthorizedBoots.com covered the key steps to choosing the best outdoor boot, discussed how to break them so you do not cause damage to your feet, and provided great care tips for making them last. We followed his advice and searched for survival boots that stood up to vigorous wear and tear in a variety of environments. In this article, we discuss which boot features are most essential to survival, define boot anatomy terms, and list our top picks for men’s and women’s survival boots.
Getting Started
When it comes to boots, there are loads of options. For survival, the weather resistance and durability will play a significant role. Also, you need to consider the long-term comfort, as you will be spending long days on your feet.
The upper can be made of leather or nylon blends. A combination of leather and synthetic mesh offers good structural support and is lighter than an all-leather upper. For keeping out rain and snow, make sure the boot is rated waterproof and has a gusseted tongue to prevent seepage through the lace holes.
Many boots offer some type of breathable liner that draws moisture away from your feet. This, in conjunction with a secure fit, will help prevent chaffing and blisters from forming.
The best fit will need to be supported by a strong lacing system. Check the way the eyelets, D-rings, or hooks are fastened to the boot, as they will need to withstand repeated stress. However, even the strongest hardware is nothing without a sturdy pair of laces, such as 550 paracord.
To choose the best type of sole, consider the terrain you will most likely be traversing. If you plan on a lot of up-and-down on steep trails, you may want to look for heel and toe brakes. Self-cleaning treads will prove helpful in muddy or rocky areas. Also, shock absorbency and flexibility for running and jumping may come in handy.
In order to properly compare different boot designs, it’s important to know the terminology. Here are the terms most commonly encountered when researching survival boots:
Collar – runs around the top of the shaft. The collar can have internal or external padding, both of which serve to protect the ankle from impact, keep debris from getting in, and provide comfort.
Carbon Rubber – a chemically altered form of rubber that is more durable, lightweight, and provides good shock resistance.
Crampon/Snowshoe Compatibility – some survival boots are specifically designed to integrate with crampons or snow shoes.
EVA – ethylene-vinyl acetate, it is a high-density durable foam that absorbs shock.
Gore-Tex – a multi-layer lining material that is designed to create a dry environment inside by shedding internal moisture from perspiration and blocking external moisture from getting in. Can be used in warm-weather gear to shed heat or can be insulated for colder temperatures to trap heat.
Gusseted Tongue – a tongue that is sewn to the boot behind the lace eyelets to form a barrier to debris and water.
Heel Brake – a tread design that provides a better grip when descending steep areas.
Heel Cap/Heel Counter – cradles the heel and prevents the foot from slipping up and down when walking.
Insole – the layer in direct contact with the bottom of the foot. Often removable and can be specialized for antimicrobial, anti-shock, or pressure relief performance.
Midsole – the layer above the outsole that provides structural support to the bottom of the foot using shanks.
Neutral Foot Position – when the ankle and feet form a straight vertical line and weight is evenly distributed. This reduces strain on feet, as well as the joints of the knees, hips, and back.
Outsole – the bottom most part of the boot that touches the ground. It can be stitched, cemented, or stitched and cemented to the upper.
Rand – seen in waterproof and water resistant styles, the rand is the rubber strip that overlaps the seam between the boot upper and the sole. Most survival boots will have this feature.
Self-Cleaning Treads – a tread pattern that utilizes the natural flex of your step to open the space between the treads and shed debris, such as pebbles and caked mud.
Shaft – the part of the boot that goes up the leg. Shaft height is measured from the point where the boot meets the sole to the maximum height up the leg. Occasionally, the circumference measurement will also be given, which is the distance around the widest part of the shaft.
Shank(s) – supportive metal or plastic strips that shape the arch of the boot. Can be a full shank, which runs the entire length, or a ¾ shank which ends at the ball of the foot.
Suede vs Nubuck vs Leather – Suede is the softest of the three, created by brushing the inside surface of leather. Nubuck is made by roughing the outside or grain surface of leather, making it stronger than suede and more resistant to abrasion and water. Full grain refers to leather that has not been brushed or roughed on either side, making it more stiff than nubuck or suede.
Toe Cap –an extra piece of material that protects the front of the boot from abrasion.
Torque/Torsion Control – how well the boot’s structure resists twisting at the ankle.
Vibram Outsole – refers to a patented diamond tread pattern, also known as a Lug Sole, that is recognized for providing excellent traction.
Vulcanized Rubber – natural rubber that has been chemically altered to resist deformation and loss of elasticity with change of temperature, making it harder, longer lasting, and more durable.
Survival Boots For Men
Mens Survival Boots
Key Features
KEEN Men's Targhee II Mid Waterproof Hiking Boot
• ESS shank provides ankle stability
• Dual-density EVA foam midsole is contoured for comfortable support
• Keen.Dry membrane lends a breathable barrier against rain
Danner Men's Radical 452 GTX Outdoor Boot
• Toe cap resists abrasion in rough terrain
• Ultra strong GORE-TEX insulates against snow
• Terra Force technology supports from all sides and prevents torsion
Salomon Men's Quest 4D GTX Backpacking Boot
• Keeps out debris with gusseted tongue
• Heel and toe reinforced with rubber to protect against wear
• Lace locking system allows for independent tightening of each section
Garmont Men's Zenith Mid GTX Trail Hiking Shoe
• Hardware is rust-resistant
• Excellent traction, even on wet rocks and mud
• Gore Tex lining provides breathability in heat and insulation in cold
Rocky Outdoor Boots Men S2V Substratum Direct Attach
• Waterproof nubuck and ripstop nylon exterior for flexible durability
• Tall 8" shaft for a higher fit
• Crampon and snowshoe compatible
• Laces are 550 military grade paracord
Rocky Men's S2v Jungle Boot
• Ideal for hot, humid climates
• Drainage holes allow water to shed quickly
• Ultra lightweight design offers support without excessive padding
McRae Footwear Men's Hot Weather Desert Boot
• Deep treads shed mud and debris
• Vulcanized rubber outsole is engineered for durability
• Fast drying Suede/Cordura upper is padded for comfort
• Discrete style tactical boot for urban bug-out
• Side zip closure allows for easy-on/off
• Lightweight athletic fit enables freedom of movement
Ariat Men's Terrain Hiking Boot
• Lower profile style includes Torque Stability composite shank
• EVA midsole absorbs shock on impact
• Removable gel orthotic for long-lasting comfort when on your feet all day
Click on the image to view current price on Amazon.
Survival Boots For Women
Womens Survival Boots
Key Features
KEEN Women's Targhee II Waterproof Hiking Boot
• Toe cap protects against impact
• Keen.Dry membrane is waterproof yet breathable for comfort
• ESS shank prevents ankle rolls on rocky terrain
Ahnu Women's Montara Boot
• Neutral positioning of the foot encourages balance and reduces strain over long hikes
• Exterior padding on collar protects ankles from bumps
• Gusseted tongue locks out rain and snow
Ariat Women's Terrain Hiking Boot
• Lining keeps feet dry with moisture wicking
• Duratread outsole is self-cleaning for optimal traction
• Shock absorbing midsole reduces strain on joints
Lowa Women's Renegade GTX Mid Hiking Boot
• Full-length nylon shank adds extra support on rough terrain
• Climate control lining draws moisture away to prevent blisters and chaffing
• Heavy duty Vibram outsole is also shock-absorbent
Salomon Women's Quest 4D GTX Hiking Boot
• Braking pattern in the rear outsole gives extra traction when descending
• Lightweight and flexible for trial running
• Cushioned gusseted tongue alleviates lace pressure
Belleville F390 Women's Hot Weather Combat Boot
• Lightweight and breathable for trekking through hotter climates
• Running shoe outsole provides ease of manuvering
• Deep treads power through mud
Danner Women's Danner Light II Outdoor Boot
• Patented Stitchdown construction provides a durable and sturdy fit
• Gore-Tex lining breathes well while locking out water
• Superior wet and dry traction with Vibram outsole
Hi-Tec Women's Ohio WP Hiking Boot
• Outsole is carbon rubber for lightweight durability and traction
• Collar and tongue are padded to provide comfort and support
• Cushioned EVA insole is also removable for a customized fit
Oboz Women's Sawtooth Mid BDRY Hiking Boot
• Natural roll of outsole propels each step
• Molded rubber heel and toe stand up to rocky terrain
• BDry membrane is both waterproof and breathable to keep feet dry and comfortable
Click the image to view current price on Amazon.
Click the image above for great tips on choosing survival boots and how to take care of them to maximize their performance.
Your Thoughts
Do you look for boots for a specific climate or prefer all-weather survival boots? Are there any other key terms we should add as a reference? Let us know in the Comments section below, thanks!
When it comes to choosing the right outdoor boot for your bug out or outdoor adventures, you should approach the decision-making process as just that, a process. Looking at just one factor like fit, price, or purpose nets limited results, meaning you might find a great shoe, but not the one for you and your purposes. As well, this process doesn’t end with the purchase of the boot. Rather, getting the best mileage out of your boots means that you break them in and learn to take care of them so that you get optimal use out of them. This article will show you how to do all of this and by the end, you will be able to pick out the right footwear for your personal survival situation.
The Fit Is King
A shoe that doesn’t fit and isn’t comfortable causes all kinds of problems that no amount of money can solve. For example, improperly-fitting shoes cause back problems and stress on the tendons and joints as well as the possibility of blisters and other foot maladies on the trail. Imagine trying to carry your bug out bag over broken terrain with your feet in agony – not a recipe for survival.
The best way to ensure a proper fit is to buy boots in the afternoon; the feet swell during the day. Also buy the shoe that fits your larger foot — everyone has one foot that is slightly larger than the other. Also make sure that your ankles and arches get the support they need to rough it on the trail.
Ouch! Don’t let your boots rub you the wrong way.
Additionally, some problems, like blisters on the heels, which are caused by too much room in the heel area, need to be addressed by other means. Thicker socks usually solve this problem. When you’re buying your boots, make sure not to skip out on a few new pairs of socks. It is smart as well to try your boots on with the type of socks you expect to be hiking in. Don’t try them on with normal cotton socks (which are a terrible idea for hiking anyway) if you are going to be walking in thick hiking socks.
Avoid painful blisters by choosing an outdoor boot with the right fit.
What Terrain Are You Likely To Face?
Not all boots are created equal, and actually, that’s okay. The type of terrain you are going to be traversing when bugging out or hiking should determine what boot you buy (after you consider fit). In other words, if your whole goal is to take a bunch of day hikes on well-defined trails, then hiking shoes will do you just fine.
Hiking shoes are a lightweight option for day hikes.
Hiking and Backpacking boots, on the other hand, count as the big daddy (most of the time) of the boot world. Don these boots when your hiking goals include heavy packs and long treks through the woods or mountains over the course of several days.
For longer treks into the wilderness with a heavy pack, you will appreciate the extra support and durability of hiking boots.
Special Boots, Material Types, And Other Considerations
Time to get more specific. You’ve taken the first steps you need to in order to find the right boot for you. The previous two steps in this guide outlined your initial goals and helped you narrow your focus. Additionally, some conditions, like extreme or alpine hiking, require an even heartier boot than a backpacking boot. The best boot for this occasion is usually a mountaineering boot.
Choose an outdoor boot suited to the terrain you are most likely to encounter.
You should also think about the materials that your boots are made from. Full-grain leather boots offer you the best protection in wet conditions and count as a must for extended trips. Other leathers like nubuck leather or split-grain leather offer benefits — in the latter case, a cost savings.
However, each has some drawbacks. Nubuck requires a good deal of breaking in time, whereas the split-grain leather will resist water to a point. As well, you need to make sure that any boot you buy, whether it’s synthetic or leather, allows for breathability.
Getting Laced Up
The laces of your boots are an important component that are often overlooked. They are essential to keeping your boots on in rough or swampy terrain and help ensure a good fit.
Opt for strong durable laces that won’t fray, such as paracord.
If you end up with a pair of boots that have poor quality laces you will want to replace them ASAP. Paracord can be a good option for this as it is inexpensive, strong, and rot-resistant.
If you want an even better option you can upgrade your boot laces to Fire Laces. These are high quality laces that are made of 550-pound paracord and integrate hidden fire starting Ferro rods into the lace tips. It is a smart way to eliminate the problem of leaving your fire starting kit at home when hiking, camping, or bugging out. You can learn more about Fire Laces by clicking here now.
Breaking Your Boots In
Even the best boots will tear up your feet if you don’t break them in properly. The best way to start breaking in your boots is by wearing them around the house for short periods of time. When you do this, act as if you’re getting ready to head outside, meaning wear the socks you’ll wear for your hikes, lace them up properly, and walk around. They’ll feel stiff in the beginning, but eventually, the materials will relax to the shape of your foot.
Don’t dive right into adventure with a new pair of boots! Be sure to break them in slowly.
That’s the time then to go out for shorter treks around town. If you need to stop for milk or go to the post office, put them on. These short distances give you the chance to notice any discomfort and spots that don’t fit right. And finally, don’t be duped into trying a quick fix. Heavier boots require a longer break-in time. You may be taking short walks for several weeks until your shoes and feet can handle the trail comfortably. Don’t skimp on this process.
Short excursions will help to shape new boots for the optimal fit.
Taking Care Of Your Outdoor Boots
Boot care is a constant process, meaning that starting from when your hike ends until you hit the road again, you should do something to care for your boots. Start with something simple. Read what the manufacturer has to say about the best way to care for your particular boot. That should act as your guide above all else.
Different materials require different care. Read up on the manufacturer’s guidelines to keep your outdoor boots in great shape.
That said, outdoor boots last longer with a bit of waterproofing. You can find this usually in the can and just spray it on before using your boots. After that, ensure that your boots stay snug; shoelaces should be intact and not frayed. Eyelets should still have their protectors if they came with them.
Basically, you need to check for anything that might fall apart on the trail. If you can fix it yourself, do so. Otherwise, a trip to the shoe-repair shop is in order before you head out on the terrain.
A small problem can grow quickly so check your boots thoroughly before heading out.
Finally, make sure that you clean your outdoor boots after each trek outside. Get the grit and grime out of the soles. Remove inserts to allow for extra breathing and to aid in the drying-out process.
Cleaning the soles after every use can help prevent cracking.
If your boots have gotten wet during your excursion put them someplace to dry for at least 24 hours. More is better. And remember that your boots don’t like extremes in heat or cold. No putting them outside in sub-zero temperatures or allowing them to dry in the sun. This eventually breaks them down.
The sun’s UV rays deteriorate your outdoor boots so set them to dry in the shade.
Conclusion
Although all of these steps represent the best practices when it comes to buying your outdoor boot, the truth remains that there may not be a very best option, only the best option for you. Therefore, these guidelines are just that. Guidelines. That’s why boot-buying is a process. The best way to find the right outdoor boot for you is to take your time and shop around. Further, the best pair of boots quickly become a pain without the proper care and breaking-in period. In short, go through all the steps for the best chance of success with your new boots.
Your Thoughts
Do you have any boot care tips or buying advice? Have you owned a pair of awesome outdoor boots? Tell us about them in the Comments section below, thanks!
About the Author
Alex Park runs AuthorizedBoots.com. He and his team of writers offer unique perspectives from their experience in the wilderness. Alex appreciates quality brands of durable boots that are specialized for different objectives, and his goal is to help you quickly identify the differentiators of each boot. Alex’s mission is to express his passion for quality tactical gear in the form of tips, reviews, updates and news.
When bugging out, your foremost consideration (after ensuring you do, indeed, have the essentials for survival) is weight – you can’t use what you can’t carry. Many times, it is gear for shelter and sleeping that tend to add the most bulk; this is where a bug-out hammock can provide a real advantage. Hammocks offer a versatile sleeping solution in a very compact package, allowing you to sleep comfortably almost anywhere.
A bug-out hammock is a light and comfortable option for sleeping that’s easy to set up and take down.
If your thoughts turn to relaxing by the beach between palm trees when you hear the word ‘hammock,’ you are not far off. Hammocks are easy to set up, comfortable, and provide a sturdy, elevated place to sleep – there may not be any cocktails served, but a hammock can prove quite useful in survival situations.
The inspiration for this article was borne out of a recent backpacking trip where a friend of mine had brought several hammocks and continually raved about their comfort. Trying it out for myself, I found the setup simple and, yes, they were indeed quite comfortable. This got me thinking: Could hammocks make an excellent addition to a bug-out bag? I think the answer is a definite yes, and have written this article with the purpose of examining camping hammocks as they apply to survival, exploring key features to look for, and checking out the top-rated ones on the market.
Key Components Of Camping Hammocks
When it comes to hammocks, there are four main components you will want to pay attention to: Material, hardware, cordage, and optional add-ons.
Material
Generally, most hammocks you find will be made from lightweight parachute material. Although this material is ultra-thin, rest assured that it is very strong and durable. A ripstop stitching pattern is desirable as it resists tears and prevents them from growing; it also dries very quickly.
Kammok engineers material that is both super-strong and ultra light, with a comfortable soft texture.
Hammocks are typically stored in a pouch that is either sewn to the side or separate; this can double as a great stow-away area for gear you will need close at hand as you sleep, such as a flashlight or a multitool. While the full-size hammock may look impossible to fit back into its pouch, they are surprisingly easy to re-pack.
For the best hammock material, look for reinforced seams and triple stitching at the joints, as this makes for extra toughness required in a survival scenario.
Hardware
The hardware on your hammock is a very important component as it affects setup and the type of straps that can be used. The best hammocks will have a carabiner at either end that can be clipped to rope or webbing. Carabiners are preferred to S-hooks, as they are less likely to become accidentally detached when shifting your weight in the hammock.
Wiregate carabiners are lighter, though locking carabiners may be more useful for other tasks besides hanging a hammock, such as securing gear to MOLLE webbing.
While most carabiners are made out of heavy-duty aluminum or steel, there are lightweight versions available. If your hammock doesn’t come with carabiners, it is more than worth it to purchase them separately as they not only make setup easier, but also are versatile tools with endless survival uses.
Black Diamond Neutrino Carabiner
Silishape Outdoors Carabiner
Metolius Bravo Key Lock Carabiner
Click the image to view current price on Amazon.
Cordage
Certain hammocks do not come with a means for hanging; if this is the case with your hammock, you will need to purchase hanging cords separately. There are two basic options: Rope or webbing straps.
If using rope, you probably already have paracord in your bug-out bag that can be used, just ensure to use a heavy enough gauge to support your weight. However, tying rope may require some tinkering in order to get the tension right; if this not something you feel comfortable with, webbing straps may be a better choice.
Whether you’re hanging a hammock with rope or straps, tree sleeves minimize damage to the bark. The Fox Outfitters Neolite Hammocks come with tree sleeves.
If using webbing straps, the advantage is that there are multiple attachment points sewn in and therefore adapt easily to different trunk sizes and distances between trees. If you’re environmentally conscious, you can purchase ‘tree savers,’ which are cover sleeves that your straps can be threaded through to minimize damage to the tree bark when hanging your hammock.
Eagles Nest Outfitters Atlas Strap
Eagles Nest Outfitters Slap Strap
OxStraps Hammock Straps
Click the image for current price on Amazon.
Optional Add-Ons
The first optional add-on you will want to consider is the size of your hammock. Camping hammocks generally come in single or double sizes; which you prefer is a matter of personal preference. Even when sleeping one person, some people feel more secure with the extra fabric provided by a double-wide hammock.
Additionally, while two adults can sleep in a double hammock, you need to be cognizant of the weight limit and always test out your hammock for comfort beforehand. In the case of a long-term sleeping arrangement, you may be better off using two single hammocks.
Protection is another consideration, with the main concerns being mosquitos and the elements. If you will be bugging out in an area where mosquitos will be a concern, choose a bug-out hammock with an integrated bug net. A bug net features a zipper closure as well as additional guy lines to keep the net suspended above you while you sleep.
Standing water attracts mosquitos so try to hang your hammock a good distance away from any large puddles.
If you want to use the hammock without the net, simply flip it over and it becomes a regular hammock. To prevent mosquitos biting through the bottom of the hammock, plan to line the bottom with a pad or blanket. To keep wind, rain, or other elements off your bug-out hammock, you can add a custom tarp.
ENO ProFly Rain Tarp
Kelty Noah's Tarp Shelter
Ultimate Survival Technologies 1.0 BASE Tube Tarp
Hammock Bliss Mosquito Net Cocoon
ENO Guardian Bug Net
Ohuhu Lightweight Sleeping Bag
Click the image to view current price on Amazon.
How To Use A Camping Hammock
Sleeping in a hammock is actually quite comfortable – the fabric is supportive and generous enough to fully encase your body. The experience is preferable to sleeping on hard ground where stiff backs and sore hips can result. Aside from comfort, they are also very easy to set up as you don’t need to spend time scouting around for level ground or worrying about whether or not rocks will poke you as you sleep. To set up a hammock, all you need are two vertical supports (typically trees) spaced roughly 10 feet apart.
Wouldn’t you rather sleep up off the ground in a sturdy hammock?
Setting Up
To secure your bug-out hammock for sleeping, make sure the end where your head will rest is only an inch or two higher than where your feet will be; this ensures a comfortable pitch but isn’t steep enough that you will slide down. You can hang your hammock anywhere that suits your needs, however keeping the center near waist height will make it easier to get in and out of.
If you’ve decided to use rope to hang your bug-out hammock, check out the YouTube video below that demonstrates how to tie strong knots that release quickly when you’re ready to take down the hammock.
If you’re using webbing straps, make sure to wrap them around the tree and pass the end through the loop at the other end. This way, the tension of your weight will tighten the strap around the tree and keep it firmly in place. To achieve your desired height, simply clip the carabiner onto one of the loops along the strap.
Extras For Utility And Comfort
Oft times, sleeping in a hammock can be colder than on the ground as air flows freely all around you. When bugging-out in colder temperatures, it’s a good idea to use a sleeping bag or a mat, or even slip a mylar emergency blanket in the storage pouch. However, when bugging-out in extreme heat, a hammock provides an effective way to cool down as the parachute material is very breathable.
Pair a hammock with a lightweight sleeping bag for cooler climates. Add a tarp for a complete sleep shelter set up.
Having a bug-out hammock on hand also provides for a quick way to sit down and have a rest. The setup and takedown is so quick and easy that it can be used anytime, such as stopping for a water break or tuning into your emergency radio for updates. For those with kids, it also provides a great way to give them break after a long hike.
Camping hammocks are kid-friendly and make a perfect place to let them rest anytime they need it.
Additionally, hammocks can also double as an emergency blanket when sheltering from a storm and offer another rather unexpected advantage – they are great for toting bulky gear! I found this out haphazardly as I needed a means to carry sleeping bags and pillows over several miles back to my car after a backpacking trip. I piled the items into my hammock, crisscrossed the ends over my shoulders, and fastened the carabiners together around my waist; it worked fabulously and held up just fine.
Chilly morning? Just unhook your hammock and bundle up in it! The ENO DoubleNest is generously sized.
Our Top Picks For Bug-Out Hammocks
Here are our tip picks for the best camping hammocks that can double as bug-out hammocks, along with their key features. For more details, please click the image to be taken to Amazon.
Single Hammocks
Key Features
Max. Wt.
Wt.
Grand Trunk Skeeter Beeter Pro Hammock
• Mosquito netting provides full protection when needed
• Flips over for use without netting
• Quality construction with triple stitched mesh and nylon
400 lbs
28 oz
Eagles Nest Outfitters SingleNest Hammock
• Reinforced seams for durability
• Aluminum wiregate carabiners are lightweight and strong
• Packs down to the size of a softball in the attached stuff sack
400 lbs
16 oz
Neolite Trek Camping Hammock
• Quick dry fabric is strong yet breathable and very lightweight
• Solid steel carabiners
• Includes two nautical grade hang ropes with protective tree sleeves
400 lbs
13 oz
Himal Hammock
• Breathable 210T nylon is comfortable and supportive
• Includes 0.31mm diameter braided nylon rope and stainless steel carabiners
• Mildew resistant fabric also dries quickly
500 lbs
18 oz
Kammok Roo Hammock
• Specially engineered fabric is stronger, lighter and softer for better comfort
• Includes 2 Dyneema slings for suspension
• Water-resistant pouch
500 lbs
23 oz
Double Hammocks
Key Features
Max. Wt.
Wt.
Eagles Nest Outfitters DoubleNest Hammock - LNT Special Edition
• Sturdy aluminum carabiners easily connect to any type of strap
• Triple interlocking stitching for strength and durability
• Compression stuff sack is attached for convenient storage
400 lbs
19 oz
Fox Outfitters Neolite Double Camping Hammock
• Generously sized for two people
• Includes tree saver sleeves and two lengths of hang rope
• High quality reinforced construction is durable and ultra lightweight
400 lbs
19 oz
Trek Light Gear Double Hammock
• Parachute nylon is rot- and mildew-resistant
• Over six feet wide, allowing for multiple sleep configurations
• No-flip design prevents accidental spills
400 lbs
20 oz
Eagles Nest Outfitters JungleNest Sleep System
• Complete sleep system includes insect net, rain fly, straps, steel carabiners, and aluminum stakes
• Full length side zipper for ease of getting in and out
• Internal ridgeline adjustment
400 lbs
32 oz
Click on the image to view current price on Amazon.
A Closer Look At Top-Rated Hammocks
Eagle Nest Outfitters DoubleNest Hammock
Generously sized and very comfortable
Enough fabric to wrap around yourself; can fit two adults or one adult and one child
Rated for up to 400 pounds – fabric is very durable and has triple interlocking stitching
Aluminum wiregate carabiners are lightweight but strong; makes for easy set-up
Packs down to about a five inch ball
Attached stuff sack has a belt with a side release buckle, allowing you to clip it onto the outside of your pack, MOLLE, or hang from a branch when not in use
Only drawback: Tree straps need to be purchased separately
The attached stuff sack on the ENO DoubleNest serves as bedside storage for a flashlight, map, whistle, or any other gear you want on hand.
Grand Trunk Skeeter Beeter Pro Hammock
The Skeeter Beeter offers a great solution to mosquitos (which are not only annoying, but also carry deadly diseases) – an integrated no-see-um mesh net
The net is fully attached, with a zipper on one side for getting in and out
Long ropes are included for holding the netting up and away from your body, affording freedom of movement
Can be used without the net by flipping it upside down and laying on the bottom surface
Made from durable parachute fabric with triple-interlocking stitching
Carabiners and rope included.
Kammok Roo Hammock
Has a maximum weight of 500 pounds, making it a super strong camping hammock
The Lunar Wave ripstop nylon fabric is engineered to be even stronger, lighter, and softer than typical parachute fabric
UV and mildew resistant
There are several utility loops on the edge for clipping gear to
Attached stuff sack provides additional storage close at hand
The stuff sack is water-resistant; especially handy if it starts to rain when your hammock is clipped to the outside of your bug-out bag
Included are two climbing rated carabiners and two Dyneema slings that are very easy to use
Kammok Roo comes with 2 wiregate carabiners and 2 compression slings.
Fox Outfitters Neolite Double Camping Hammock
Very breathable fabric with heavy duty triple interlocking stitching
Supportive and comfortable, even for two people
Includes two solid steel carabiners to attach to two 5’6” lengths of nautical grade rope
Includes two tree sleeves to protect trees from rope damage
Conclusion
Hammocks are a lightweight alternative to traditional means of sleeping and shelter when camping and can be a valued addition to a bug-out bag due to their low weight and comfort. Camping hammocks can be used for a full night’s sleep or simply for a moment’s rest. Paired with a tarp, you can protect yourself from insects, wind and rain. Additionally, the fabric is versatile and durable and can be used for many other applications. Consider adding a bug-out hammock to your bug-out or get-home bag.
Your Thoughts
Would you trade in your tent for a hammock in your bug-out situation? Have you ever used a hammock while out camping? What was your experience? What advantages / disadvantages do hammocks have over traditional camping gear? Let us know in the Comments section below, thanks!
Cellular technology and the Internet have completely transformed communications in the 21st century. Think for a moment: If suddenly your computer, TV, and cell phone stopped working, how would you communicate with others? Where would you go for information? The reality is, in the case of an emergency, most people would be completely cut off from the world, reliant on new technology that would cease to function in a disaster. Don’t be one of those people; in this article, we’re going to provide all the information you need to select the best emergency weather radio that will keep you in touch when all other communication mediums fail.
What Is An Emergency Weather Radio
Not your father’s transistor radio: Technology has come a long way, making emergency weather radios portable and self-powered.
In the case of disaster, an emergency radio will allow you to receive signals modern technology can’t, and stay current on important information such as weather or updates on the disaster situation. NOAA Weather Radio broadcasts on frequencies not accessible to standard radios, such as the one that may be in your car, and is able to receive vital updates from the National Weather Service in the case of severe weather such as hurricanes, tornadoes, and flooding.
Stay informed of events around you so you know when to bug-in and when to bug-out.
When there’s no power, most emergency weather radios have additional features to power the device via solar or hand crank. When all other technologies fail, if you have an emergency radio, you will have access to information about road closures, the direction of the storm, where emergency shelters are located, and whether or not armed forces have been dispatched. With this knowledge at hand, you can better plan your next course of action; whether that be to stay put, or head out in a vehicle or on foot.
During a wildfire, air quality warnings and evacuation information is broadcast for your safety.
The best part is, unlike most survival gear, there’s no need to store your radio away until it’s needed – you can use it every day! It works just as well as a standard radio and can be used to monitor weather alerts, receive current news, or listen to your favorite music station.
Features To Look For In An Emergency Radio
While emergency weather radios do share many features with standard radios, there are certain functional requirements you will want to specifically look for in your emergency radio including tuning, sound quality and options, power source and battery life, durability, size and weight, and multipurpose options.
Tuning
AM/FM, weatherband, and shortwave capabilities will give you the most options as the sensitivity of a radio determines how many stations it receives and the quality of reception. NOAA uses Very High Frequency (VHF) waves, transmitted using narrowband FM; most emergency radios will have a feature (either a sound or light) that will alert you when severe weather or other emergency broadcasting is taking place. Specific Area Message Encoding (S.A.M.E.) is also used by NOAA and the Emergency Alert System (EAS).
An emergency radio with S.A.M.E. technology is capable of customizing alerts to your specific area; some even have the functionality to turn off the alert at the End Of Message (EOM) prompt, so that the alert doesn’t continue after the first transmission has played.
Tune in to emergency broadcasts to follow events in your area and stay informed of health and safety guidelines.
In terms of digital vs. analog, digital tuning is much easier to accurately tune and program; however, an analog tuner presumably won’t be affected by an EMP event, whereas a digital system may become unusable.
Emergency Radio Fact: In testing your emergency weather radio, you may notice that more AM stations are received at night; there is a simple explanation for this. Daytime AM waves travel over the surface of the earth through a phenomenon referred to as groundwave propagation; generally, these waves reach no further than 100 miles. At night, reflection from the ionosphere, known as skywave propagation, increases the distance that AM waves can travel up to 100s of miles.
Sound Quality and Options
Things to look for: Maximum volume of audio, auxiliary input, headphone jack, mono or stereo.
When checking for sound quality, the maximum volume of the speakers will be measured in decibels (dB); often referring to as sound quality from a specified distance away, such as how loud the sound will be at one meter from the radio.
An equalizer setting is of little use for emergency purposes, but if you plan to use your radio on a daily basis for things such as news or music, you may want to look for a radio offering optimized settings for talk radio and various music genres, as well as indoor and outdoor use.
In terms of additional options, look for radios that offer headphone jacks and auxiliary input for playing audio from another device.
You may want to listen to disaster reports through headphones in front of children so you can filter information that may be scary to them. This is also a helpful feature in noisy areas.
Power Source and Battery Life
Things to look for: Solar or hand crank capabilities, as well as plug-in feature for regular use; battery life.
Power versatility is a key feature in an emergency radio; look for radios with at least one alternative means for powering. The more options you have for powering your radio, the better your chances of staying connected; radios that run only on batteries require a backup supply and you may face the possibility of running out.
Hand Crank
The hand crank is a simple, yet effective, form of power. Hank crank radios convert mechanical energy into electric energy, which is then stored in a rechargeable lithium ion battery. The efficiency of these systems varies greatly, but typically two minutes of cranking will provide five minutes of radio use at full volume; while that may seem like a lot of work for limited use, it is very dependable and always available.
Power up with a hand-crank anytime, anywhere so you don’t miss important alerts. Image via Alan Levine on flickr.
Solar Cell
Another common source of energy is a solar cell. You will find that some radios can run directly off solar power while others need to charge the battery, then run off stored energy. This method is of course limited to daytime use and may take up to six hours to fully charge a battery.
AC Adaptor or USB
If your radio comes with a rechargeable battery, you should also have an AC adaptor or USB that will charge directly when power is available, such as at home. Similar to solar powered radios, some can run directly off a connection while others need to charge first and then run.
This radio stores the AC cord right on the back so it’s always ready when you need it. Click to view on Amazon.
In addition to your radio, you can also charge other electronic devices via mini, micro, and USB ports. Whether or not you can fully charge a smartphone depends on the battery capacity and discharge rate, but for emergency communications, this can be very helpful.
Power up your cell phone to touch base with family or make emergency calls.
Battery Life
Whichever option you choose to power your radio, it’s extremely helpful to ensure there is some type of battery life indicator; this way, you will know when your battery is running low and can adjust your usage or seek out another power source.
Durability
Things to look for: Water and drop resistance, general construction, antenna, and buttons.
We were very surprised that only a few of the emergency radios we reviewed listed water and dust resistance ratings. Ideally, any device designed for outdoor usage should be splash resistant, but to be safe, we recommend tucking your radio in a plastic freezer bag to keep it protected when not in use.
You never know what conditions may arise so the sturdier the radio, the better for bugging out.
To ensure your radio functions when you need it to, choose one with a fold-away hand crank and antenna; this way, those items are less likely to be damaged when packed in a bug-out bag. Additionally, a rubberized finish provides better grip – as does a lanyard or handle – and some models even have protective roll cages to withstand a fall on the ground. If you’ll be heading for the hills in an emergency, these are the must-have features.
Size and Weight
Things to look for: Ease of transport.
When prepping your bug-out bag, size and weight are of utmost importance. Many emergency radios weigh less than one pound and some are even small enough to fit in a pocket. If you plan to bug-in, or store your radio at your bug-out location, you may want to prioritize other features over portability.
Multipurpose Options
Added features are always a plus as they can help reduce the weight of your bag by combining several different items into one. Emergency radios can come equipped with a plethora of useful, additional features, including flashlights, compasses, strobes, sirens, and whistles. For more multipurpose tool ideas for your bug-out bag, CLICK HERE.
Key features to look for include the following:
Flashlight: Having a backup flashlight you can power indefinitely will ensure you won’t be left in the dark
Clock and calendar: Useful for keeping track of time when far removed from civilization or on a long-term bug-out
Temperature and humidity readings: This will allow you to monitor weather conditions
Cables: Always check to see which cables are included; simply because your radio has certain ports doesn’t guarantee it comes with the accompanying cables, many times these are sold separately
In addition to the USB port for charging other devices, the Eton Scorpion II has an integrated caribiner for clipping to a bag or belt. Click the image to view on Amazon.
Top 10 Emergency Weather Radios
The following table showcases our picks for the 10 top emergency weather radios as well as key features, weight, and price range. To view the item and its current price on Amazon, click the accompanying image.
Emergency Radio
Key Features
Weight
Price
Eton NSP101WXGR Scorpion ll
• Multiple power options to keep it running
• LED flashlight for an extra light source
• Rugged construction withstands outdoor use
14 oz
$$
Ambient Weather WR-111B
• Solar panel extends battery life
• Illuminated digital display is easy to read
• Ultra lightweight for packing in a BOB or GHB
5 oz
$$$
MIDLAND WR300 Weather Radio
• Alarm clock style is ideal for bug-in use
• S.A.M.E. technology for receiving local reports
• Preset up to 30 counties in the memory system for quick access
2 lbs
$$
Eton American Red Cross FR1
• Compact design with flat folding crank and antenna
• NOAA alerts for weather preparedness
• Smartphone charger works quickly to power devices
1 lb
$$
Sony ICF-S10MK2 Pocket AM/FM Radio
• Simple analog AM/FM radio fits in a shirt pocket
• Excellent signal sensitivity for picking up stations
• Runs on 2 AA batteries
10 oz
$
Ambient Weather WR-335 ADVENTURER 2
• Uses rechargeable lithium ion battery or 3 AAA batteries
• Audio input plays music from iPods and phones
• 125 decibel siren for emergency signaling
1 lb
$$
iRonsnow IS-088 Dynamo Weather Radio
• Rubberized coating for enhanced grip
• Efficient hand crank - 1 min yields 20 min of radio play
• Lightweight and compact for backpacking and BOB
7 oz
$
Eton FRX5 Hand Crank Emergency Weather Radio
• Solar panel fully charges battery in 5 hours
• Rated IPx4 for protection against splashes
• Illuminated buttons for use in the dark
1.4 lbs
$$$
Kaito KA600 NOAA Weather Radio
• Solar panel is adjustable to achieve optimal exposure
• Input stations 4 ways - manual, direct digital input, ATS, and memory tuning
• Temperature and humidity display, plus calendar and alarm clock for daily use
20 oz
$$$
Ivation AM/FM/NOAA Radio
• AM/FM/NOAA radio with Bluetooth for wirelessly connecting to devices
• Display shows station, date, time, and temperature
• Rugged and water resistant design goes anywhere with you
3.5 lbs
$$$
Click the images to view current pricing on Amazon.
Our Picks For Best Emergency Radios
Best Emergency Radio For Bugging-In
Our top pick: MIDLAND WR300 Weather Radio
This particular emergency weather radio has more of a countertop design and is less suited for travel. It receives NOAA and Environment Canada alerts using S.A.M.E. technology as well as an audio alarm to warn of extreme weather in your area. It can be programmed to receive alerts from up to 23 counties, which can be especially helpful in areas prone to hurricanes, floods, wildfires, or tornadoes.
For those that are hearing-impaired, it has a lighted display that features a text warning message along with the county the alert was issued in; it also displays “EXP” when a particular alert has expired. You have the option to silence test alerts and weather watches while still being cognizant that one has been received through an indicator light; should a watch turn into a warning, your alert will sound.
One drawback for this particular radio is that it does not recognize EOMs and automatically returns to standby five minutes after the EOM prompt; however, you have the option to manually mute the alert at the end of the message. Another issue is that the headphone jack is mono and not stereo, meaning sound will only come out of one earbud; however, you can correct this with a adaptor to make it double monaural, which will produce sound from both headphones.
In addition to emergency broadcasts, it functions fully as a clock radio with alarm and is therefore a good bedside radio for everyday use. An AC adaptor is included and four AA batteries can be used as backup should the power go out.
Best Emergency Radio For Battery Life
Our top pick: Eton FRX5
The Eton FRX5 is an all-around great emergency weather radio, but its standout feature is the efficient power system. Its hand-crank will provide thirteen minutes of listening after only two minutes of cranking – more than double the average for crank radios. When plugged in using the AC adaptor, a full charge is achieved through the lithium battery within five to six hours.
At maximum volume (an impressive 90 dB at one meter), the radio will play continuously for over fifteen hours. It uses AAA alkaline batteries and also has a high-efficiency solar panel that will keep the battery topped up when in use or fully charged after five hours of direct sun. This outperforms the solar panel systems previously discussed, making the Eton our pick for best battery life.
Additionally, this radio charges devices quickly over an extra fast USB output of 5V 2.1A and receives AM, FM, and NOAA; it also has S.A.M.E. technology and works well even in remote areas. You can program up to 25 locations from which to receive local reports and alerts.
Bonus features: Splashproof with IPX4 rating, headphone jack, auxiliary in jack, glow in the dark locator, LED flashlight and red emergency beacon, and alarm clock.
Best Emergency Radio For GHB/BOB
Our top pick: Ambient Weather WR-111B
Weighing less than half a pound, the WR-111B is perfect for use in your get-home or bug-out bag. It comes equipped with NOAA alerts and a digital AM/FM tuner, making the WR-111B a powerful receiver in a compact design. It is extremely portable and has a rubberized finish as well as lanyard for ease of carrying.
The battery can be charged via USB, AC, hand crank, or solar panel, and a low-battery indicator lights up when battery power falls below three volts. One drawback is that it does not use S.A.M.E. technology for receiving customized alerts.
The sturdy hand crank can be used for recharging while the radio is playing and conveniently folds away when not in use. An AC adaptor is available to purchase separately for plugging into an outlet; a “hard charge” via USB or AC adaptor is recommended every few weeks to maintain battery life.
The WR-111B emergency weather radio also has an LED flashlight. Click the image to view on Amazon.
While the hand crank and solar panel can be used to charge the radio in an emergency, keep in mind that the solar panel serves to extend the battery life but does not provide a full charge; ensure you read the instructions carefully regarding care of the battery for optimal performance.
The battery is also removeable and replaceable, which is a useful feature if you intend on regular usage. This radio also includes cables and adaptors to charge different types of cell phones (mini, micro, and USB) as well as a headphone jack.
Best Emergency Radio For Selection Of Features
Our top pick: Kaito Voyager Pro KA600
When it comes to extra features, the Kaito Voyager Pro is fully loaded. The illuminated digital displays show mode, station, and battery life, as well as temperature and humidity. It features digital tuning that is adjustable via manual knob or buttons, including a number pad for direct entry of stations and programmable preset memory. The calendar, clock, and alarm are useful additions for everyday use as well as in a grid-down scenario.
With a turn of the dial, power input switches from the AC adaptor, solar charger, and AA batteries. The solar panel pivots 180 degrees and is larger than most emergency radio solar panels; in full sun, it is powerful enough to run the radio directly. The included rechargeable battery fully charges in under two hours via USB or AC, while you also have the option of using the hand-crank.
It receives high quality reception in FM, AM, and all 7 NOAA weather channels, even in remote areas – although the maximum volume is a bit low at 76.7 dB at a one meter distance. However, if background noise drowns out the sound, there are two headphone jacks. The antenna retracts neatly onto the back when not in use.
Another feature to note are the flashlights: It has a 5-LED reading light below the solar panel for mapping and small tasks, plus a 3-LED flashlight above the hand crank.
For portability, it is compact in size but a bit on the heavy side, weighing in at 20 oz; also, it is not rated for water or dust resistance.
Choosing The Best Emergency Radio For YOU
When choosing the best emergency radio for your needs, you need to consider transportation requirements, ease of use, and your particular priorities.
Transportation Requirements
Before choosing a radio, determine whether or not you will be transporting it, i.e. bugging out or using it in a get-home scenario, or staying put for bugging-in.
For bugging-out and get-home scenarios, weight matters and extra multipurpose features will help to offset any added weight by providing key items such as a backup flashlight or survival whistle. Additionally, having a means to charge batteries for other devices will come in quite handy.
If you’re traveling through the wilderness, choose an emergency weather radio that is lightweight and has self-powered options.
When bugging-in, you need not be as concerned with size and weight, but local reporting features, such as S.A.M.E., will be very useful. While you may not need extra multipurpose features, a self-powered radio is always a boon, especially during power outages.
Ease Of Use
If you can’t use your radio, no amount of features or alternative power sources will be of use; make sure you practice using your radio so you are familiar with all of its features and can tune in to required information channels and sources.
If there are any preset functions, make sure to tune them into your local stations so everything is ready to go. Additionally, if you live in a remote area or plan on bugging-out to one, ensure your radio has the capacity to receive signals in your area.
Test your radio in remote areas to make sure you can receive signals from your local stations.
Know Your Priorities
To make sure you get the best value for your money, think carefully about your needs before purchasing and choose a radio that addresses all your must-have features.
Conclusion
When cut off from everyday technologies we depend on, such as cellular and the Internet, staying informed and receiving the information you need to optimize your survival plan becomes a real challenge. Don’t be caught off-guard; safeguard your survival by staying informed during an emergency, no matter what. Choose an emergency weather radio that best serves your purposes and will provide the most value in a disaster. Most important, use your radio regularly so that you become familiar with its various functionality and are fully prepared to stay connected when disaster strikes.
Your Thoughts
Have you ever used an emergency weather radio before? Have you used one in an emergency? What was your experience like? Share your thoughts and questions with us in the Comments section, thanks!
We recently published a great article that provided tips for building shelter in any survival situation, which we highly recommend that you read and familiarize yourself with. However, while learning to build shelter from found materials is a skill we feel everyone should have, there are also many advantages to carrying a tent with you for excursions into the wilderness.
Having a tent saves the effort and time of preparing shelter from scratch – allotting you more energy to expend on other aspects of your camp – and can provide life-saving shelter in cases of extreme weather or ready-made shelter when bugging out at night.
Whether for backpacking, recreation, or bugging out in a disaster, having a tent on-hand can be indispensable. However, especially in disaster scenarios, size matters: the smaller and more lightweight your tent, the better. In the case of your bug-out bag, not only are you looking for gear that is light enough to be carried over long distances, but also that doesn’t take up so much room that other survival essentials are left behind.
What is ‘lightweight’? Generally, for a one-person tent, it can be as light as a few pounds, with anything up to approximately seven pounds still considered lightweight.
Choosing the Best Lightweight Tent – Features to Look for
When choosing the best lightweight tent, there are generally two features that are must haves: weatherproof and waterproof; and ease of set-up.
Weatherproof and Waterproof
All it takes is one night out in a torrential downpour to learn the importance of having a lightweight tent that is also properly fitted to withstand the elements. To ensure a lightweight survival tent that is sure to shield you from the elements, we recommend using a bathtub bottom, extra tarp, protected seams, and a rainfly.
Click the image to see the best price for the Hilleberg Janu and user reviews on Amazon.
Bathtub Bottom
When I purchased my first survival tent, the key feature I looked for was size to accommodate the large group I was camping with in the northeastern U.S. during the summer. I soon regretted focusing on size and not looking into different fabrics and sealing methods as we were hit by thunderstorms on three out of three trips. Even with a tarp underneath the tent, the interior floor was soaked.
Learn from my mistake: the best lightweight tents will come with a bathtub bottom – a bathtub-like floor that extends several inches up the sides of the tent before attaching to the walls, ensuring no seams are sitting on the ground. The bottom panel is also treated with a chemical water sealant (typically polyurethane) to lock out moisture.
Click the image to see the best price for the Morrison Mountainsmith and user reviews on Amazon.
Extra Tarp
Even if you’ve purchased the absolute best lightweight tent, it is still advisable to bring along an extra footprint tarp that can be laid under your tent to protect from punctures that can result from roots, sticks, and rocks.
Most bug-out or survival tents will generally come with a custom-sized tarp, but if yours doesn’t, simply use a regular tarp and tuck the edges an inch or so inside the perimeter of the tent. Remember that if the ground cloth extends beyond the edge of the tent, rain water can collect and be driven between the tarp and the tent; it’s always best to let rain roll off your tent straight onto the ground.
Protected Seams
When looking for seams that will keep out the elements, folded seams with double stitching are much more durable and effective at keeping out water than single seams. Additionally, taped seams provide extra strength and protection as they have an extra layer of fabric sewn into the seams.
To further protect your seams from the elements, pretreat them with water sealant. Set up your tent outside on a dry, sunny day and treat all seams by applying water sealant to all threads both inside and outside (including those along doors and on the rainfly), allowing all seams several hours to thoroughly dry and then repeating the treatment. For optimal performance, apply water sealant annually.
Tent Seam Sealants
Gear Aid Seam Sure
Coghlans Seam Seal
Silnet Silicone Seam Sealer
Coleman Seam Sealer
Kenyon Seam Sealer #3 - 4 Pack
Aqua Seal Water-Based Seam Sealer
Click the images to view current pricing on Amazon.
To test your seams to see if they are watertight, simply give them a pull: if tension is created on the seam and you can see light coming through the stitching holes, the seam is not watertight.
Rainfly
Most double-walled survival tents will come with a coordinated rainfly that can be drawn back to provide access to the tent. Choosing a lightweight tent with a rainfly is a simple and easy way of ensuring weather and waterproofing.
Ease of Set-Up
The best way to ensure that you will be able to quickly and easily assemble your lightweight tent in all manner of situations is to actually go out and practice! You don’t ever want to find yourself in a camping or (especially) survival situation without having practised setting up your tent.
While practice makes perfect, there are certain features that will make your survival tent easier to carry and set-up, including poles, stakes, stake loops, and guylines.
Poles
Generally, when looking for the best lightweight tent, your choices for poles will be between aluminum, fiberglass, or no poles. For backpacking and survival we recommend aluminum tent poles over fiberglass as they tend to be stronger, weigh less, and be easier to repair.
Aluminum is a stronger material than fiberglass, necessitating less to achieve the same strength; the added weight of fiberglass will be miniscule when camping in the backyard, but extremely important when heading for the hills with your BOB where every ounce counts.
Additionally, aluminum can be easier to repair than fiberglass. When fiberglass fractures, it can tear your tent and does not lend itself easily to repairs; if your fiberglass pole breaks, it will most likely need to be replaced. Conversely, aluminum will typically bend before it snaps, giving you more of a chance to perform long-lasting repairs – an advantage that is crucial for long-term survival.
There are, however, advantages to using fiberglass poles. For one, fiberglass does not corrode, whereas aluminum poles will – although they can be treated with anti-corrosive coating, it will eventually wear off, especially in wet climates. Also, fiberglass is typically priced a little lower than aluminum.
Stakes, Stake Loops, and Guylines
For anyone who has ever been camping, you know that it doesn’t take much of a breeze to send your tent rolling through the trees, potentially ripping or breaking it. Stakes are what keep your tent from blowing around and are an essential part of your tent shelter kit; using them properly can very literally mean the difference between a secure shelter and losing your tent completely in a survival situation. Choosing the right stakes for your survival tent can be equally as important as choosing the best lightweight tent.
Stakes should be driven into the ground at a slight angle, away from the direction of force of the line. Ultralight titanium stakes get the job done at 0.2 oz. apiece, but are likely to loosen in soft or loose terrain. Although they are quite thin, they are less susceptible to bending when hammered into place. Aluminum stakes are a sturdy option and can handle more abuse while being driven into the ground; however, they are also heavier to carry around. Steel stakes are the heaviest, weighing about an ounce apiece but are also heavy duty.
The shape of the stake will also have an effect on how easy it is to drive in and how well it stays put. If you find yourself in loose soil or sand, there are Y-beam and ‘V’ stakes that work well in these conditions and come in plastic or aluminum varieties. If you’re expecting snow, a curved stake with holes in it goes in easily and freezes in place.
Click the images to view current pricing on Amazon.
If you happen to find yourself on extremely rocky ground or without stakes at all, there is always the “big rock, little rock” method that you can use, as seen in the video below:
A final point to consider is how your tent will anchor to the stakes. Most tents will have nylon webbing loops at the base corners and sometimes midway up each side, as well as on the rainfly. These loops attach either directly to stakes or to guylines then to the stakes, to secure your tent and help keep its shape.
Depending on what type of stake you are using, you may wish to tie small loops of paracord to the webbing in order to better grip the stakes. Paracord is an excellent choice for long-term use as it has a high propensity for withstanding fraying due to friction. Measure out the amount of paracord you will need for your tent and pack that amount right in your tent bag, so that it will be available quickly in a bug-out situation.
Additional Considerations For Choosing The Best Lightweight Tent
When selecting the best lightweight tent, especially for survival scenarios, in addition to the features covered above, you will also want to consider the amount of vestibules and storage pouches, shape, and color.
Vestibules and Storage Pouches
Having extra storage space can be a huge advantage – especially if you intend on bugging out for a long period of time – but is not as crucial as some other features. If your lightweight tent comes with plenty of storage space, great, but don’t add unneeded weight simply to try to fit in better storage.
A-frame tents will typically have a vestibule at either end while dome-shaped tents will usually have a rainfly that extends beyond the entrance to create a small, sheltered space.
The interior of your tent may contain mesh pockets for holding smaller gear, such as flashlights and multitools, which allow you to keep these important tools at-hand and available when you need them. Another useful feature you may look for in your tent is a loop at the apex, which is perfect for hanging a lantern from a caribiner to illuminate your tent at night.
Shape
Generally, there are two shapes your tent will come in: A-frame and dome. The biggest drawback of an A-frame tent is the lack of headroom allotted along the sides. How big of an inconvenience this is depends on the number of occupants; for a single-person tent, this is much less of a concern than for an entire family.
Dome shaped tents tend to have a square footprint and therefore allow for more vertical space close to the sides, making them an excellent choice when there are multiple people needing to fit inside. Additionally, domes provide slightly better weatherproofing as rain sheds more easily and wind passes over more smoothly due to their aerodynamic shape; however, these advantages diminish the larger the dome as surface area becomes a factor.
Click the image to see the Mountainsmith Genesee and user reviews on Amazon.
Color
In most situations, the color of your tent will have little to no effect on its performance; however, keep in mind that dark colors (which absorb more light energy) can raise interior temperatures (beneficial in cold climates while detrimental in excessive heat), and bright colors (such as yellow or orange) do not blend well with natural landscapes and can be easily spotted (if staying hidden is a priority, choose earth tones or camouflage patterns).
Capacity
Your choice of capacity will depend on your needs. Generally, the manufacturer will state the maximum number of sleep pads that can fit the footprint of the tent. This makes for a cozy but comfortable fit. Taller people or those with a larger build may benefit from going for one size larger than the actual number of people the tent is intended for, or going with an A-frame style which tends to be longer.
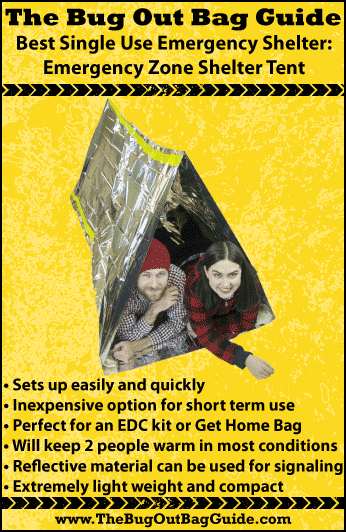
Additionally, if you are looking for options for a get-home bag, there is no need to lug around anything larger than a one-person tent. In the summer or as a back-up, a simple single use mylar shelter may suffice.
Click to see the Emergency Shelter Tent and user reviews on Amazon.
If you live in an area where low temperatures and precipitation are a regular occurrence, you may choose to upgrade to a full one-person tent. This is especially useful not only in harsh weather conditions but also if your journey lasts more than one night. Mylar shelters are not intended for repeated use but a one-person tent can easily be taken down, re-packed, and set-up again.
Click to see the Snugpack Ionosphere and user reviews on Amazon.
Our Top Picks For Best Lightweight Tent
Lightweight Tents
Key Features
Capacity
Ideal For
Weight
High Peak Outdoors Maxxlite Tent
• Bathtub bottom seals out rain and snow
• Aluminum poles offer structure
• Rain cover forms a vestibule at either end to store gear
2
Cold weather
Rain, snow
6.70 lbs
Emergency Shelter Tent
• Include attached paracord for easy set up
• Doubles as a survival blanket
• Dual mylar layering is tough and insultating
2
First aid
Day hikes
0.50 lbs
Eureka! Timberline 4 Tent
• Well-ventilated with windows that are hooded by the rain fly
• Interior mesh pockets, loops, and gear loft for storage
• Weight to size ratio makes it a good choice for a family of 4
4
Families
3 season backpacking
7.81 lbs
Snugpak Ionosphere 1 Person Tent
• Slim 20" x 6" bundle easily fits into most packs
• Quick and easy to set up and take down, includes aluminum stakes
• Fits one person plus a good sized pack
1
Long-term use
Moderate temperatures
3.34 lbs
Mountainsmith Morrison 2 Person 3 Season Tent
• Bathtub floor with taped seams keep out the rain
• Rainfly creates additional 14 sq ft vestibule
• Aluminum "V" stakes stay put in a variety of terrains
• Includes reflective guylines with tension adjusters
2
Rainy or windy climates
3 season backpacking
4.69 lbs
Wenzel Alpine 3 Person Tent
• Weather Armor polyester fabric seals out the elements
• Bathtub bottom with mud mat to keep interior clean
• Fiberglass poles
3
Small families
Economical option
8.00 lbs
Mountainsmith Genesee 3 Season Tent
• Fully enclosed rainfly with protected top vents
• Superfine mesh keeps out insects
• Reflective guy lines include plastic tighteners
4
Families
Windy and rainy climates
6.56 lbs
Hilleberg Jannu 2 Person Tent
• Low profile is effective at shedding sleet and snow
• Strong side wall and frame stand up to high winds
• Asymetric vestibule protects entryway and decreases draft
• Well worth the price for alpine camping
2
Harsh winter conditions
6.81 lbs
EUREKA Apex 2XT Tent
• Double-coated StormShield poylester fly and bathtub bottom to protect against weather
• Rain fly can be rotated 180 degrees for easier set-up
• Inner tent mesh wall provides good ventilation
• Heavy duty Coleman fiberglass frame is freestanding (do not have to thread through fabric sleeve)
2
3 season backpacking
5.75 lbs
Click the images to view current pricing on Amazon.
Conclusion
Carrying a lightweight tent that offers an immediate shelter option can provide a real advantage over scrounging to find materials to build shelter, especially in the dark or harsh weather. However, trekking with a survival tent the many hours (or days) that may be needed in a bug-out scenario could prove extremely tiresome; for this reason, it is imperative that if you are going to pack a bug-out tent, pack one that is lightweight and therefore easy to carry across long distances.
Additionally, the less weight and space taken up by your tent, the more room left for you to pack other essential items you will need while bugging out.
When choosing the best lightweight tent for your needs, size and portability will always be your primary concerns. Secondary considerations should be the tent’s ability to stand up to the elements and how easy it is to set up. Additionally, look for vestibules and storage pouches, the best shape for your needs (A-frame vs. dome), the color that will perform best in your situation, and the desired capacity.
Your Thoughts
Do you think a lightweight tent is worth the extra weight in your bug-out bag and/or get-home bag? Do you have any tips or gear suggestions that have made it easier for you to set up a tent? Share your thoughts in the Comments section below, thanks!