It’s the quintessential moment in any horror flick – the part where the heroine is trying to sneak silently away from the bad guy by moving stealthily through the old, rickety house (aren’t they always set in an old, rickety house?), but try as she might to move quietly, her position is given away by a loud creak from the old wooden staircase. We all wonder, why doesn’t she know how to move silently?
Makes for great suspense, but in the real world, learning how to walk silently is a valuable skill that should be in every prepper’s survival arsenal. Moving in silence is not only a valuable skill, but also easy to learn and practice. Think about your safety in a SHTF situation – how beneficial would it be to be able to move or run in silence?
Knowing how to walk quietly on a creaky floor or staircase gives you the advantage of stealth.
There are many instances you may run into where such a skill could save your life, including sneaking past checkpoints or aggressive / hostile people, scavenging while other (potentially hostile) people are around, leaving an area when unfriendly people arrive, or successfully stalking prey while hunting.
The slightest sound can alert your prey and ruin an opportunity to secure a meal.
Learning to use stealth techniques is an invaluable survival skill that you and any member of your family can learn – plus it’s easy to practice! In this article, we will teach you 5 essential tricks for moving in silence – as well as 1 bonus trick! – that will allow you to move undetected and help keep you safe.
5 Tricks for Moving in Silence
1. Maintain Your Center of Balance
If you are carrying anything, especially a backpack, stash it if you can as it throws off your center of balance. Look for somewhere safe you can leave it where it will be recoverable later. While a well-fitted backpack will be cinched tight to your body and have good weight distribution, it’s a surety that the added 30-50 lbs you are carrying around will change your center of balance.
The reason this is important is that it is far easier to sneak around quietly with your natural movements and center of gravity as opposed to your body trying to compensate for the unexpected extra weight.
Moving in silence is more difficult with the added bulk of a backpack because it throws off your natural balance. Image credit Joseph on flickr.
2. Get Rid of Noise Makers
When trying to move silently, if you have anything on you that jingles or jangles – get rid of it. If you are carrying items such as keys, change, jewelry, gear, buckles, or straps hanging off your body or bag that have the potential to make noise, make sure to eliminate them from your person.
Bring only what is necessary for the mission and be sure to secure any gear so that it will not make a sound when you move.
Zippers are another item that can give you away when trying to move quietly, but ranger bands can help with this – you can learn how to make ranger bands here or purchase them here. The video below shows how ranger bands can be used to silence zippers:
Also be aware of the clothing you are wearing. Some clothing may have the potential to swish or get caught on things, especially loose cargo pockets, which can easily get caught on a corner or exposed nail.
Silent clothes are slim-fitting with minimal protrusions. This large hooded jacket may keep you warm but it would make it difficult to walk quietly.
3. Don’t Move Blindly
When moving in silence, always scope out your path ahead of time, don’t stumble along blindly. Before moving, make sure to take a few seconds to survey the area around you and scope out the best path to take.
You’ll likely need to employ some improvisation at some point, but having a general plan of where you are going, including things to avoid and knowing where safe / quiet areas are, can mean the difference between detection and moving stealthily to safety.
If you have a long way to go, plan your trek by stopping in safe or concealed areas and then scoping out the next leg of your trip from there.
4. Look Out for Landmines
By landmines, we mean surprise objects that can give away your presence if stepped on. Items to be on the lookout for include broken glass, dry leaves, twigs, and animals.
Learn how to walk silently by avoiding noisy objects, such as pine cones and twigs.
When scoping out your path, try and find the way that has the least amount of debris that could potentially make noise and give you away. As you’ve no doubt seen in the movies, something as simple as the snap of a twig can immediately alert others to your presence.
Additionally, look out for animals and avoid them at all costs. The bark of a startled dog or the rustle of a bird hastily flying away are key indicators to others of your location.
Startling a flock of birds into flight is a dead giveaway of your presence.
5. Proceed with Caution
Even weight distribution and foot placement are key to moving stealthily and keeping your footfalls as quiet as possible. Always move carefully and with intent.
If you are unsure about your next step, test the location lightly with your toes and gradually place the rest of your foot down once you’ve determined it’s safe. Also be mindful not to knock anything over if you need to lean against something at some point. The video below gives a detailed demonstration of stepping with your toes first to walk quietly across any surface:
Bonus Trick For How To Move Silently
While the preceding 5 tricks will help you to move quietly and undetected, there is always the chance that something will go wrong, which brings us to our bonus trick – always have an escape plan.
If you are detected and need to run, it’s imperative you know which way to head in order to flee safely. Sometimes it can be as simple as going back the way you came, but in case that path is blocked or otherwise inaccessible it’s always prudent to have at least one additional escape route.
If escape is not a viable option, you may want to have some means of defending yourself against whomever detected you. This could include non-lethal options such as a flashlight or pepper spray, or entail more serious options such as a survival weapon or firearm.
General Stealth Techniques
Along with the tricks above, keep the following in mind when attempting to walk or move undetected:
Use a red flashlight to move at night as this will preserve your night vision and attract less attention EC11 and EA21 from Nitecore both come with a secondary red LED in addition to their main light for just this purpose.
If avoidable, do not sneak around barefoot – yes, it is quieter to move barefoot than with shoes, but you will be in serious trouble if you get caught as it is much harder to run barefoot and you run a higher risk of injuring your feet
Be aware that floorboards will make more noise in the summer than in cold weather.
While you may be able to walk lightly over these rocks barefoot, running could cause serious injury to your feet.
Practicing How To Move Silently at Home
If you want to learn to move as silently as a cat, reading this article is a great start, but you’ll need to practice what you’ve learned. The great thing about stealth movement is that it’s a survival skill that’s easy to practice in your everyday life. Here are some tips and tricks on how you can incorporate stealth movement into your daily life and learn to move undetected:
When you’re just beginning, feel free to practice in socks or barefeet, but after you start to get the hang of walking silently, start practicing in the shoes or boots that you plan on wearing when bugging out
Take advantage of everyday situations to practice, such as movie night – when getting up to grab some popcorn, see if you can sneak back without anyone noticing;
Practice walking quietly past your pets – see if you can pass by Fido without attracting his attention
Turn practice into game time with your kids – start a game where one person sits centrally in a room (blindfolded, if need be) and challenge everyone else to get from one side of the room to the other without being heard (this also has the added benefit of teaching all members of your family how to move silently)
When moving around at night, see if you can move silently enough so as not to wake up your baby / husband / wife
While at work, try walking into your co-workers’ cubicles / offices / workspaces without them noticing your presence, at least until you say “Hello,” – no need to creep anyone out!
Conclusion
The ability to move about undetected is a highly valuable skill to have in survival situations and can be learned and mastered by anyone. Moving stealthily has myriad life-saving applications as well as practical uses for everyday life. Running or walking silently is a skill that can be practiced almost anywhere, which makes it one of the easiest survival skills to master. In order to learn how to move silently, keep in mind these 5 key tricks:
Maintain your center of balance
Get rid of potential noise makers
Don’t move blindly, choose your path intentionally
Look out for landmines
Proceed with caution and have an escape plan!
What are you waiting for? Start practicing now and pretty soon you’ll be able to move around your friends and family as stealthily and silently as a cat!
Your Thoughts
Can you think of other situations where it is important to know how to move silently? Have you practiced stealth techniques on your own or with your family? Tell us about your experience in the Comments section below, thanks!
Typically we count on weather services and electronic devices to know what to expect from the sky. We may alter travel plans, make a quick trip to the store, or simply pack an umbrella in reaction to an impending storm. However, these services will likely come to a halt if disaster strikes and alternative means of monitoring weather conditions will be necessary. For those that opt to head for the hills, it will become vastly more important to know how to predict the weather in the wilderness.
Nature itself provides many clues as to what is in store. The clouds, plants, animals, insects, and the moon have been used for centuries to predict precipitation, droughts, and floods. Farmers, fishermen, sailors, and others who spend long periods of time outdoors, and whose livelihood depends heavily on the weather patterns, have devised ways to foresee the weather in order to prepare themselves.
Having the skills to read the warning signs that nature provides has short-term and long-term benefits that can greatly increase your chances of survival in a bug-out scenario. Whether a major storm is brewing and you need to prepare to build a shelter in for the day or if the likelihood of flooding doubles and you need to reconsider your location for the season, learning how to predict the weather using nature is a valuable survival skill.
Observing The Sky To Predict The Weather
The most intuitive way to predict the weather is to look to the sky. The clouds, wind direction, air pressure, and even the moon are directly related to incoming weather. Paying close attention to the changes in the sky and knowing how to interpret what you see gives you advance warning of what is to come and enables you to prepare.
A red rising sun warns of rain to come.
There is an old saying, “Red sky at night a sailor’s delight. Red sky morn, sailors take warn.” At sunset, the red sky is caused by sun rays passing through dust particles which accumulate at the forefront of a high pressure system. However, in the morning a red sky occurs when a low pressure system carrying moisture is on the way. Therefore, a brilliant red sunset usually precedes a clear day but a red sunrise is a warning that a storm is coming.
A red sky as the sun sets in the west is a sign of clear skies.
Another colorful way to predict the weather is the formation of rainbows. In the northern hemisphere, a morning rainbow in the east indicates rain is on the way, as weather generally moves east to west.
Reading Clouds
Cloud identification is a science in itself but there are some simple indicators that can prove very useful, especially when trying to predict the weather in the wilderness.
When you see cumulus clouds, it’s a good day for traveling, foraging, and other outdoor activities.
White, fluffy clouds sitting high in the sky are non-threatening as they pass overhead. When the cloud cover is low and dark, a storm is building and appropriate measures should be taken to prepare your camp. Gathering extra firewood and storing it in a protected location will ensure that you have dry fuel to burn during and after the storm.
Low, dark cloud cover is a sure sign that a storm is building. Make sure your shelter is ready to withstand rain and wind.
To give yourself more time to prepare, there are two easily identified types of clouds that form prior to storm clouds: mare’s tails and mackerel skies. Mare’s tails are wispy cirrus clouds that are somewhat hazy and undefined, as the tail of a galloping mare. The same conditions that cause them to form also cause airplane trails to linger in the sky.
Cirrus clouds precede incoming frontal systems and indicate changing weather. Image credit k4dordy on flickr.
Mackerel skies are altocumulus clouds and are also a sign of rising moisture levels. Independently, these each warn of rain coming within a few days, but seen together, rain will typically fall within 24 hours.
Mackerel skies are named for their resemblance to the scales of a mackerel fish.
While clouds are often thought of as bringers of rain, they also act as a layer of insulation. On an overcast night, the radiant heat from the earth is trapped by the cloud layer, leading to a higher temperature in the morning. When the sky is clear at night, the radiant heat escapes and the morning will be cooler as a result.
Detecting Air Pressure
Though air pressure is less noticeable than cloud cover, it is a very dependable indicator of incoming weather conditions. Low atmospheric pressure leads to cloud formation and precipitation. High pressure systems are associated with rising air and clear dry skies.
One way to detect the current air pressure conditions is to observe the smoke from a campfire. If the smoke is rising steadily in vertical column, the air pressure is high but if it is sinking and swirling, the air pressure is low and precipitation may soon follow.
Studying how to predict the weather turns your campfire into a barometer.
What The Wind Tells About The Weather
Wind is named for the direction it comes from, so an easterly wind blows from east to west. A gentle prevailing wind or light, variable winds are signs of clear weather. Strong winds occur when two fronts with different temperatures meet, and usually mean that a storm is forming.
An awareness of the surrounding climates will also help you read the wind. For instance, if a desert lies to the east of your location, wind coming from the east will typically carry dry, warm desert air. Mountains also play a role in that air flowing over a mountain will usually release precipitation as it rises along the side facing the wind and will move down the opposite side with dry air.
“Circle Around The Moon, Rain Or Snow Soon.”
People have long looked to the moon to provide insight into atmospheric conditions. As the old saying states, when the moon has a hazy ring around it, precipitation is on its way. The ring is caused by the presence of dust particles building up in the atmosphere. It means that a low pressure system is on its way, bringing rain or snow with it. As it passes through, the low pressure system will push the particles along.
You can see how the moonlight reflects on the particles in the air, forming a hazy ring.
When the moon appears clearly defined and bright, it is due to an absence of particles and moisture. This is characteristic of a high pressure system and the next day has a high chance of being dry. In the short-term, this is a simple and effective way to predict the weather.
When the outline of the moon is clearly defined, fair weather can be expected.
For long-term or seasonal weather predictions, the phases of the moon can reveal clues. When two full moons occur in the same month, there is a higher chance of flooding. It is also said that when the tips of a crescent moon point upward and the moon looks like a bowl that can hold water, a dry spell is coming. When the new moon looks like a frown, or a bowl that water would spill out of, a wet spell is predicted.
This bowl-shaped moon is often associated with a period of dry weather.
Weather Signs In Nature
The natural world is built to survive and living things will make adjustments in order to maintain life and produce offspring. Sometimes the changes are so subtle they can hardly be detected but there are some common plant and animal behaviors that reveal clues about the weather. When bugging out, you can use these clues to increase your own chances of survival.
How To Predict The Weather Using Plants
Upon waking, take a close look at the ground. Morning dew on the plants, while itself is wet, can actually be a sign of a dry day to come. A lack of morning dew can occur when dry winds have been pushed through ahead of a storm system bringing rain close behind. Of course, if it rained the night before, this will be more difficult to observe and you will need to look for additional signs in order to predict the weather.
A dewy morning can mean that a dry day is in store.
The phrase “it smells like rain” has some truth to it. The moist air of a low pressure system brings out the scents of plants, as they release their waste under this condition, so the air will smell more pungent just before a rain. Swamps will also release gases during a low pressure system, making for a telltale sign that a storm is moving in.
Visual signs that it is time to prepare for wet weather are readily apparent in trees. The leaves of deciduous trees will curl upward in anticipation of a rainstorm. Pine cones will open their scales in dry air but close them in high humidity.
The increase in humidity prior to a storm causes deciduous leaves to curl upward.It looks like a dry sunny day for this pine tree.
Plants also have the ability to foresee more long-term conditions and will adjust their growth accordingly. Crops, such as onions and corn, will grow thicker husks when a harsher winter is predicted in order to provide more protection to their seeds. Similarly, evergreens will produce larger, more robust pine cones, and acorns will form thicker shells- all to provide the seeds with a better chance of surviving extreme winter conditions. If you notice these signs, be prepared for a cold, long winter.
A thicker husk provides the seeds with better insulation against extreme temperatures.
How To Predict The Weather Using Animals
The combination of heightened senses and well-developed instincts makes animals highly adept at sensing bad weather conditions. Be on the lookout for changes in feeding patterns, behavior, and sound level that may indicate rain is on the way.
Here are some specific examples of animal behavior that can be used to predict when a storm is coming:
Fish will feed voraciously at the surface prior to a storm so that they can ride it out in deeper water where food is scarce, so an excellent day of fishing usually means you should seek shelter and be prepared to cook the day’s catch in the rain.
Turtles begin to seek higher ground 1-2 days before a large rainstorm, so you may see them on roads or other areas above normal water levels.
If birds are flying high, the weather will likely be clear for a few days. Birds will fly lower in dropping pressure systems because the change in pressure hurts their ears. They will also exhibit frenzied feeding. Squabbles at the bird feeder can mean that a storm is coming and birds are stocking up in preparation of riding out the storm in their nest.
Along coastlines, seagulls will take shelter before a storm and birds in general become very quiet.
Squirrels, similar to birds, will aggressively stock up on food prior to a pending storm.
Cats’ ears are very sensitive and they do not tend to wash them but a change in pressure may cause your cat to rub at its ears, indicating a drop in pressure and a storm on the way.
Horses and cows are known to exhibit similar ear sensitivity behaviors when the pressure changes.
Herd animals, such as cattle, will group tightly together, usually facing the same direction, when a storm is approaching. They also tend to head for high ground.
In addition to predicting major storms, animals can also sense long-term threats in the weather pattern. This information is highly valuable when preparing your bug out camp to withstand low temperatures and difficult conditions. A harsh winter means that food will be scarce and opportunities for foraging and hunting will be limited.
Depending on the amount of snow cover, it may be challenging to gather firewood. Keeping a fire going will be vital and your bug out party will need as many warm layers as you are able to find or make. All of these preparations take time, so the sooner you know, the better.
In general, if you notice extra thick coats of fur on domestic animals or local wildlife, expect dropping temperatures. Conversely, when their fur comes off in tufts, warmer temperatures are right around the corner.
If birds begin migrating earlier than usual, it is a sign of harsh winter to come. The brown section in the middle of a woolly bear’s body is also used to predict how harsh the upcoming winter will be; the thinner the brown stripe, the harsher the winter is expected to be. While there is not much research to back it up, a 70-80% success rate is pretty good for an old wives tale!
The Isabella Tiger Moth caterpillar, often referred to as the “woolly bear,” is an age-old predictor of winter conditions. The one on the left(photo credit Sheila Sund on flickr) is thought to indicate a short winter, while the one on the right(photo credit USFWS on flickr) shows a harsh winter is in store.
Farmers have even used cow fertility rates to predict whether there will be a drought the following year- a drop in fertility occurs in anticipation of a future water shortage.
Do cows know how to predict the weather?! Many animals will make similar adjustments in breeding in response to foreseen conditions.
Resources On How To Predict The Weather
To futher explore the topic of how to predict the weather using nature, check out these excellent resources on clouds, weather, navigating, and storms.
Resource
Author
Subject
The Lost Art of Reading Nature's Signs
Tristan Gooley
Forecasting, tracking, navigating and more by reading clues from nature
The Natural Navigator
Tristan Gooley
How to read navigational clues from the sun, plants, tides, stars and more to find your way
The Weather Wizard's Cloud Book
Jim Duncan, Louis D. Rubin Sr., Hiram J. Herbert
A full guide to using clouds to predict the weather
Instant Weather Forecasting
Alan Watts
Cloud formations and reading the sky to predict the weather
Instant Storm Forecasting
Alan Watts
Focuses on forecasting strong winds, thunder, hail storms, hurricanes, tornadoes, typhoons, and waterspouts
Instant Wind Forecasting
Alan Watts
Learn to read clues to make predictions for wind conditions
Truth About Nature: A Family's Guide to 144 Common Myths about the Great Outdoors
Stacy Tornio and Ken Keffer
Great for families! Explore myths about nature in this interactive guidebook
Click the image to view the book on Amazon.
Conclusion
Plants and animals have been “bugging out” and surviving in nature since the beginning of time. There is much to gain by observing their weather predicting skills and honing our own. When living in the natural world, a simple thunderstorm can be catastrophic if you are not prepared for it. Anticipating a harsh winter can help you ration supplies and apply your energy effectively so you have adequate food and fuel stored. Knowing how to predict the weather will help you to make wise decisions in favor of your survival.
Your Thoughts
Do you know any other ways to predict the weather in the wilderness? Have you been in a situation where knowledge of weather signs in nature benefitted you? Share your experiences in the Comments section below, thanks!
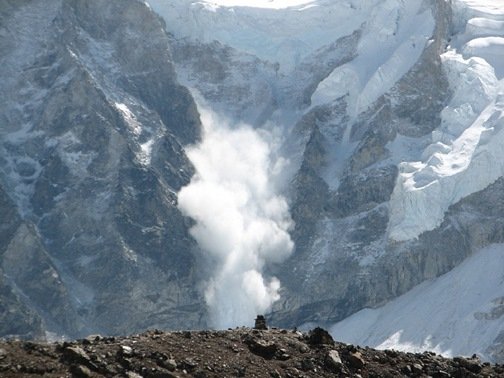
A big part of winter is the ability to enjoy winter sports and explore snowy, mountainous expanses. However, lurking behind the beautiful facade of freshly fallen snow is the deadly risk of getting caught in an avalanche. Anyone who participates in winter sports or mountain expeditions needs to have avalanche preparedness high on their threat assessment list. Even if you don’t engage in activities where the threat of avalanches is high, you never know when you may need avalanche safety skills – especially if your bug-out plan may take you through snowy, mountainous regions or if you live in the backcountry.
Avalanches are some of the most deadly obstacles nature can throw at you and when it comes to preparing for avalanches, prevention is your most important skill. Always ensure you know as much as possible about the area where you will be traveling, including daily conditions, avalanche warnings, avalanche-prone areas, local emergency telephone numbers, and how to identify and avoid high-risk situations.
While prevention is your best defense against avalanches, there are techniques you can use to help you survive should you become caught in an avalanche. In this article, we’re going to discuss what those techniques are as well as introduce important avalanche safety gear that you can use to increase your chances of surviving an avalanche.
Crucial Avalanche Safety Gear
Item
Details
Backcountry Access Tracker2 Avalanche Beacon
• Digital triple antenna processor uses 3 AAA for 200 hours of transmit or 1 hour of search mode
• Detects and tracks multiple burials for group situations
• Lights indicate direction and display indicates distance in meters to quickly locate victims
• Includes harness
BLACK DIAMOND PIEPS DSP Sport Avalanche Beacon
• Digital triple antenna plus reference antenna with 50 meter search radius
• Mark function allows you to flag signals in multiple burials
• Single button design is easy to operate with gloves on
• Includes harness
Ortovox Zoom+ Avalanche Transceiver
• Digital triple antenna with motion sensor that switches back to transmit to protect rescuers in secondary avalanches
• Uses higher, faster beeps to indicate proximity to the victim so your eyes are free to scan the area
• Also displays distance and direction
Ortovox Avalanche Rescue Set-Zoom+
• Rescue set includes Ortovox Zoom+ transceiver, probe, and shovel
• 240 cm aluminum probe features Kevlar tension system and depth markings
• Shovel is reinforced for rigidity and high side walls provide 2.5 liter volume for efficient digging
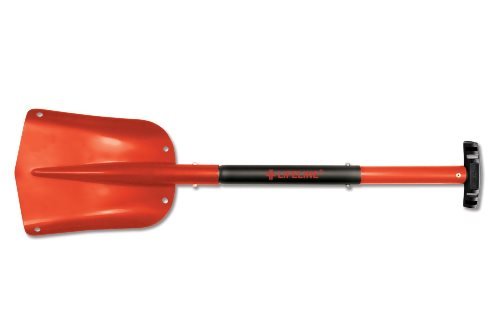
AAA 4004 Red Aluminum Sport Utility Shovel
• Lightweight shovel weighs only 1.3 lbs and disassembles into 3 pieces for easy transport
• Telescoping handle adjusts between 25-32 inches for better leverage
• Sturdy aluminum scoop for handling heavy snow and ice
Black Diamond Transfer Shovel
• Hard anodized scoop has a sharp edge for cutting through packed snow and ice
• Removable handle extends for digging in deeper pits
• Compact trapezoidal design fits well in most backcountry packs
Backcountry Access Dozer Hoe Shovel
• Versatile design works as a shovel or converts to a hoe to adapt to the situation
• Large slip-proof grips on handle and blade improve grip even with gloves on
• T6 heat treatment prevents snow from building up on the inside of the shaft
Backcountry Access Stealth Avalanche Probe
• Rapid deployment action for when every second counts
• Collapses to a bundle about 18" long by 2" across to store easily in a backpack
• Laser etched depth markers indicate how deep to dig. Also helpful for reading snow pack layers
Black Diamond Quickdraw Probe Tour
• Aluminum shaft with alloy tip that is wider than the shaft for improved sensitivity
• High visibility markings for determining depth
• Includes rapid deployment stuff sack, which allows the probe to be removed and assembled in one step
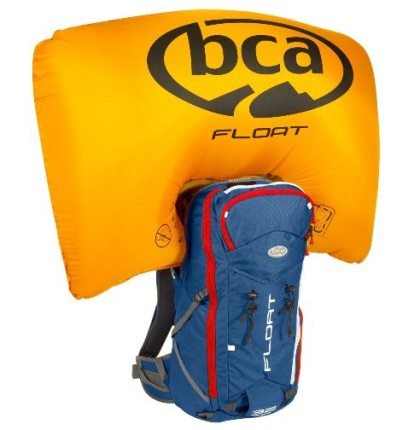
BCA Float Airbag
• Airbag trigger can be mounted on the left or right side for optimal access
• Pack features gear integration points for carrying snowboards, skis, radios, water bladder, ice axes and more
• Entire system weighs only 7.1 lbs, including the cylinder (sold separately)
• Uses 2700 psi to rapidly inflate the float when triggered
• Can be refilled at a certified refill station after use
• Lightweight at 1.45 lbs and designed to work with the BCA Float Airbag
Ortovox Mens Avalanche Rider 24 ABS Backpack
• Designed to work with M.A.S.S. system, sold separately
• Removable SPS Pro2 back protector to help prevent spinal injuries
• Chest strap features a safety whistle to signal for help
• Modular Airbag Safety System (M.A.S.S.) includes dual airbags with independent air chambers for added safety
• Inserts into Ortovox Avalanche Rider backpack in just minutes
• Release grip can be configured on the right-or left-hand side, with the angle and height adjustable to the quickest access location for the wearer
• Equipped with MIPS (Multidirectional Impact Protection System) for direct and oblique impacts
• Aramid fiber bridge disperses energy due to its high tensile strength
• Adjustable ventilation and straps for a snug and comfortable fit
Smith Vantage Unisex Adult Snow Helmet
• Koroyd lining absorbs 30 percent more energy than styrofoam, offering better protection in both low and high impact crashes
• Boa FS360 fit system uses a halo design for the perfect fit
• Extra thick Snapfit ear pads provide full protection of the ears
Click the images to view current prices on Amazon.
When equipping your crew with survival gear, remember that each and every member needs to be equipped with these items – a shovel will be of no use if it is buried with the victim and the same goes for probes. As for the avalanche beacon, each member of your crew needs to have one harnessed to their chest, not in a pocket or backpack as these items can easily become separated from the person in a violent tumble.
Every member of your party needs to be equipped with avalanche safety gear and survival techniques before heading into the backcountry.
Avalanche Beacon: The One Piece Of Gear You Should Never Be Without
What it is: An avalanche beacon is a type of transceiver that can be used to locate its wearer in the event of an emergency.
How it works: The avalanche beacon sends out a radio signal, transmitting at 457 KHz (a universal and international radio frequency). Avalanche safety beacons are also able to switch to receive signals from other beacons – one of the many reasons why everyone in your party should be wearing one.
When a signal is received, the beacon will beep with increasing volume as it gets closer to the source of the signal. This allows you to pinpoint the location of someone buried beneath the snow.
Diagram of how the Black Diamond PIEPS DSP Sport Avalanche Beacon detects and displays multiple burials. Click the image to learn more on Amazon.
There are two types of beacons: analog and digital. The analog systems use a single antenna and have a broad range, able to receive signals from further distances. A beep is typically used to indicate the location of a signal. The digital systems use multiple antennas and have a much narrower range of signal reception. Digital systems use both beeps and a visual display to accurately narrow in on a signal and some even have light signals to indicate direction and display the distance to the signal.
Before setting out on any excursion, your beacon should be fully charged, turned on, and set to transmit at 457 KHz. In times of emergency, it can be very difficult to move, much less access your device, if you are buried under snow – or worse, you may be unconscious.
Additionally, when you or someone in your crew becomes buried in an avalanche, the window of time you have to be found or to find someone else is very narrow – 15 minutes at most. Everyone in your crew should practice with their beacons ahead of time so that they are proficient in sending and receiving signals, as well as following signals to find the source.
The lights indicate direction and the number tells the distance in meters to the transmitted signal from another avalanche beacon. Click the image to view the BCA Access Tracker2 on Amazon.
A harness is an extremely important piece of avalanche safety equipment that will keep your beacon close to your body and protected underneath your clothes. By having your beacon harnessed to your body you reduce the risk of it becoming separated from you.
While some avalanche beacons will come with a harness, others require you to purchase it separately. Before purchasing your beacon, check to see if a harness is included and if not, make sure you purchase one.
Probe
What it is: A probe is a lightweight, collapsible stick typically six to seven feet long once assembled.
The ripcord action of the Black Diamond Quickdraw Probe makes for fast deployment when it counts. Click the image to view this probe on Amazon.
How it works: A probe is used for probing into the snow in order to locate someone buried beneath the surface. Your probe will provide you with a good idea of where to start digging should one of your crew members be buried by an avalanche. Look for quick-deployment designs that snap into place, ready for use immediately. Probes are also used to assess the current snow pack to determine avalanche risk.
Shovel
Backcountry shovels are designed to be compact, lightweight, and ultra sturdy for quick set up and vigorous digging. Click the image to view the AAA Sport Utility Shovel on Amazon.
While fairly self-explanatory, a shovel is an essential tool to have on-hand for avalanche safety, especially for rescuing those caught in an avalanche. In order to perform an effective rescue, you will need to dig quickly, a task that is much more easily performed with a shovel. Look for a collapsible, high-volume shovel and remember – carrying a shovel with you will be more than worth it when you need it as your window of opportunity is so slim.
Helmet
Head injury is a serious concern especially when it comes to outdoor sports. Surviving an avalanche is no different than surviving an extreme skiing accident. Wearing a helmet will help provide protection from head trauma in the event of impact – whether during a fall or in an avalanche. In fact, it is quite common for avalanche victims to die prior to burial due to sustained injuries, so any added level of protection is prudent. For more information, please review this resource from BackCountry.com.
Avalanche Airbags
Avalanche airbags have been gaining popularity among outdoor enthusiasts but have also met with some skepticism.
What it is: An avalanche airbag is a backpack-style flotation device that can be deployed should you become caught in an avalanche.
How it works: The principle behind the airbag is that it makes your body larger without increasing your mass, thereby decreasing your density and heightening your chances of staying closer to the surface. While an avalanche airbag by no means guarantees survival, it can help your efforts by protecting your head, neck, and shoulders from impact.
The aforementioned skepticism stems from a fear that avalanche airbags encourage reckless risk-taking by providing a false sense of security. For more information, check out this resource from OutdoorGearLab.com and see how they work in the video below:
When traveling with an avalanche safety airbag system, be sure to check with the airline regulations. The cylinder will need to be emptied and you may need paperwork with it. For more information on traveling with survival gear, CLICK HERE.
What You Need To Know About Avalanche Safety
Signs are one way of warning visitors about avalanches. Image via Rexness on flickr.
Avalanche Rating System
Whenever you are heading out in mountainous or snowy territory, always pay attention to the local warning system. Typically, the system will consist of a rating between 1 and 5, where:
1 – Low chance of avalanche
2 – Moderate chance of avalanche
3 – Considerable chance of avalanche
4 – High chance of avalanche
5 – Extreme chance of avalanche
Geological Conditions for Avalanches
The layering of different types of snow can make an area more susceptible to avalanches. Powdery snow is an especially unstable base layer for heavier snow as the wet snow compacts into a slab that can easily slip off the sugary base on an incline.
Avalanches typically form on slopes between 30-45 degrees, however, avalanches can form on slopes of anywhere between 25-60 degrees. In terms of ground slope shape, a convex shape will have a higher tendency to avalanche than a concave shape.
The pattern of snow collection results from sun and wind exposure.
Slopes that lack trees and thick brush will have no anchor points and are therefore more susceptible to avalanches. Additionally, the direction that the slope faces and the time of year also play a role in how likely an avalanche is to occur. In mid-winter, a north facing slope is the most dangerous while those that are south-facing become dangerous in the spring.
A slope that faces into the wind will not only accumulate less snow, but also experience compaction from the wind. Conversely, a slope sheltered from the wind will collect a large volume of drifts and be less compacted, creating prime conditions for an avalanche to form. As such, avoid trekking out on days with steady winds of 15 mph or more due to the dangerous drifts created.
Warning Signs an Avalanche is About to Occur
Pay close attention to local warning signs and avoid restricted areas. Image via Cory Doctorow on flickr.
A key warning sign to look for in anticipation of an avalanche is a deep layer of newly fallen snow as it has not had a chance to compact. When assessing an area, look carefully at the trees and rocks as this is where compaction comes from. Inserting a probe into the layers of snow can help assess what is happening with the layering underneath.
Another avalanche safety indicator is the shape of the snowfall. A layer of small needle or pellet-shaped crystals can mean danger as this type of snow can suddenly give way, much like a house of cards. Conversely, large snowflakes compact more easily and are ‘sticky,’ although a heavy rate of snowfall (> one inch per hour) of any kind makes for bad conditions.
A dry slab is another warning sign, this occurs when old snow layers break off as a unit and slide down the mountain in one big slab. The sheer mass of the slab causes it to pick up speed as well as additional snow, resulting in the entire side of the mountain coming down with it. Dry slabs cause the most deadly types of avalanches due to their large scale, size, volume, and the speed with which they occur.
Temperature is another avalanche gauge to be aware of. The lower the temperature, the less stable the snow will be. Temperature / sun exposure that allows for some melting and settling is safer than a shadowy area that remains below freezing. However, if the temperature is too high, such as in the spring, wet snow slides can form.
When reviewing an area for warning signs of an avalanche, look for the following:
Evidence that a particular path has avalanched before, indicating that area is prone to avalanches
Whether or not avalanches have occurred on nearby slopes
Current snow conditions are unsafe
Hollow-sounding snow
Cracks in the surface of the snow (an indication a dry slab is forming)
Avalanche Safety And Survival Tips
While avoiding an avalanche entirely is the best way to ensure survival, if you are out backcountry skiing, boarding, or climbing and an avalanche comes pouring down after you there are steps you can take during the initial commotion that will help increase your chances of getting out alive.
Steps to Take When an Avalanche Begins
As soon as you notice signs of an avalanche, begin to move away from the center as quickly as possible. The center flows at peak velocity and volume, which makes it much more difficult to fight against. Your first goal should be to get yourself toward the closest side as quickly as possible. If you’re really lucky, you may be able to get completely out of the way and avoid being swept up in the avalanche.
Often times, the cause of an avalanche is activity and it will form right under your feet. If you react quickly and jump uphill, you may be able to get yourself to safety and avoid being swept away. If you’re unable to get out of the way fast enough, the next step is to prevent yourself from being buried. It may sound simple enough but when confronted with a massive force of snow and ice, it becomes extremely challenging.
As your body is more dense than the snow, you will naturally sink. Rescuers recommend using a swimming or thrashing motion uphill in the opposite direction of the flow to help keep you up near the surface. The closer you can stay to the surface, the less digging you will need to do once the snow settles, giving you a huge advantage in terms of avalanche survival.
If you can find a tree or a rock, this can provide an anchor point for you to hold onto and maintain your position in a less powerful avalanche. Delaying your descent for even a few seconds can improve your chances of not being buried as deeply, or even at all.
Airbags, like this one by Backcountry Access, help increase your chances of staying “afloat” in an avalanche. Click the image to view details on Amazon.
Another prudent move is to hold your hand over your head as this will give you a better chance of being seen by rescuers as well as provide a sense of which direction to start digging after the snow settles.
In terms of lightening your load, there are mixed schools of thought. On the one hand, the lighter you can make your body, the easier it will be to stay afloat or pull yourself out of the snow; however, on the other hand, you never want to willingly separate yourself from your survival equipment.
Keep in mind that if you are encased in an avalanche, your immediate situation is that you are trapped in a cold environment and may have to wait a long time before anyone locates you. Getting rid of anything that will help keep you warm, nourished, provide first aid, and most importantly, help others locate you, would be a counterproductive move to your survival.
A key tip if you become trapped in an avalanche is that as the snow begins to slow down, fill your lungs with air and hold it in to give your chest room to expand after the snow settles. Snow is very heavy and its weight causes it to compact quickly. Without performing this maneuver, you may not be able to expand your chest to take in air after it settles.
Steps To Take When Trapped In An Avalanche
Once you have stopped moving, time is of the essence. Your first priority should be to get to the surface as quickly as possible to avoid running out of air or becoming trapped. In the first 15 minutes you have the highest rate of survival (about 93%), but your chances decrease significantly after that.
If after the avalanche has settled, any part of your body is above the surface – and you’re sure of it – begin to dig in that direction. However, being tossed around and buried can be very disorienting and finding yourself in a situation where you’re not sure which way is up is not uncommon.
If you are unsure of which direction you should dig, gravity can be a good tester. Visible rising breath is a good indicator but there is a more reliable test – the spit test. Clear a space near your face and spit – the liquid will go straight down compliments of gravity, telling you to dig in the direct opposite direction to reach the surface.
Unlike drowning, when you are trapped in an avalanche, there is air trapped in the snow with you. To create a larger pocket for breathing, continually push the snow away from your face. Additionally, your body movement will compact the snow around you creating more air space.
With this much snow, a probe and a shovel are essential avalanche safety equipment. Image credit Clayoquot.
If you are close enough to the surface, continue to to dig upwards, poking anything you can above the surface, such as a ski or brightly colored clothing, as this will make it easier for your rescue party to spot you. If you’re not close to the surface, it might be best to conserve your energy and focus on breathing.
Definitely make an attempt to call out for help but do keep in mind that when you are trapped beneath the surface, you may be able to hear others calling for you but they are unlikely to be able to hear you. If you can hear your rescue party but it’s obvious they can’t hear you, remain calm and give them a few minutes before calling out again. Otherwise, you may waste your air supply and voice by continually shouting to people who can’t hear you.
A rather unconventional but potentially life-saving tactic when buried in an avalanche is to urinate. For one thing, the pressure of being buried may be very uncomfortable on your bladder, but more importantly, the odor acts as a beacon for rescue dogs sniffing around the surface.
Avalanche rescue dogs are trained to sniff out buried victims. The stronger your scent, the more likely they will be to find you. Image via Paul Morris on flickr.
The mere thought of being caught in an avalanche is terrifying and should you have the misfortune to ever be buried by one, no doubt your natural instinct will be to panic. Fight this urge. By remaining calm, you will slow your breathing and preserve the available air beneath the snow, which will afford you more time to get out. This is where preparedness presents a major advantage. If you know what to do it will be easier to remain calm and you can focus on the survival tasks at hand.
If you want to experience the terrors of surviving an avalanche without leaving the safety and comfort of your home, check out this video from the helmet cam of a backcountry skier who was buried in an avalanche. Luckily, he finds his way with a lot of help from his friends. Notice how they had to dig for him using their skis and hands – a shovel would have been very helpful!
Conclusion
When it comes to avalanche preparedness, awareness and knowledge are your best tools. Always be aware of the daily and regional conditions in your area, make sure you and your crew are packed with the proper equipment, and attend training courses to learn more about avalanche survival. Remember, when it comes to avalanche safety, avoidance offers your best chance for survival, always err on the side of caution when out enjoying the backcountry.
Your Thoughts
How do avalanches rank in your threat assessment? Are they something you are expecting and prepared for, or a rare occurrence you don’t expect to encounter? Have you ever been in an avalanche or used avalanche safety gear? What was your experience like? Tell us your thoughts and leave your questions in the Comments section below, thanks!
The gray man theory is a way of disappearing into the crowd so you can move unnoticed when disaster strikes. The idea is that you can conceal your preparedness by blending in with the crowd before or during an emergency.
While it is generally referred to as the ‘gray man theory,’ this theory can, of course, be applied to anyone, man or woman, of any age, who needs to blend into a crowd amidst a disastrous situation to conceal the fact that they have survival skills and/or are carrying tactical gear.
When you think of ‘blending in with the crowd’ it’s generally a negative, right?
Nobody wants to be just like everyone else. You want to be unique, to stand out – that is, until there’s an emergency and you’re the only one prepared. As a prudent prepper, you’ll be ready when disaster strikes, but what will everyone around you be doing?
Panicking, most likely.
In states of panic, people become desperate, and desperation can lead people to do whatever it takes to stay alive – at this point, you certainly don’t want to be singled out as the one person prepared for survival.
Disappearing into a crowd is an extremely useful survival skill.
Why Use the Gray Man Theory?
There are lots of advantages to blending in with the crowd when disaster strikes.
For starters, by not drawing attention to yourself, you’ll be able to move more quickly and easily through the crowd without alerting others to the fact that you are prepared to handle the situation.
Also, by blending in and appearing to be among the unprepared, you are less likely to make yourself a target of those in desperation who may try and take your survival gear off you by force.
The gray man theory is really about protecting yourself and your family by concealing the fact that you are indeed prepared to survive in the face of disaster.
The gray man theory allows you to use the herd to your advantage.
The Benefits of Being a Gray Man
In a true disaster situation, your primary objective will be to move yourself and your loved ones as quickly as possible to a safe place – be that your home or bug-out location.
In a disaster, everyone around you will have the same goal – get somewhere safe – but most will not have a sound plan in place, leading to frantic behavior and desperate attempts for survival.
In this situation, disappearing into the crowd and not drawing attention to yourself or your state of preparedness can greatly increase your chances of survival.
How many of these people look prepared to handle a crisis?
As most around you will be unprepared for disaster, you will undoubtedly feel the urge to help those in need. However, your number one priority needs to be your own survival, and you should only help others if you can do so without endangering yourself.
By blending in, or becoming a gray man, you will be less likely to be approached by others seeking assistance and, more importantly, less likely to be targeted by opportunists looking to prey on those with the forethought to pack essential items for survival situations.
How To Be a Gray Man
The best way to not leave a lasting impression is to not leave any impression at all.
This is the concept behind the gray man theory, and it sounds simple enough, but execution can be challenging.
This guide will cover the basic concept behind the gray man theory and provide some key tips and tricks for effectively making yourself ‘invisible’ in a disaster scenario.
Steps to Becoming a Gray Man (or Woman)
The ultimate goal of becoming a gray man or woman is to camouflage yourself into appearing as though you are just part of the crowd to prevent others from identifying you as a potential gold mine of supplies or information. By exuding confidence and preparedness, you will draw in opportunists who will attempt to capitalize on your resourcefulness to the detriment of your own survival.
To conceal the fact that you are prepared with survival gear and skills from others, there are four key areas you will want to focus on: how you act, how you move, how you look, and how you carry your gear.
How You Act
The key to acting as a gray man is to appear average and non-threatening. Be careful about what you say and to whom you say it – being known as strongly antagonistic or too outspoken about your political beliefs can lead others to make assumptions about you and mark you as a prepared individual.
Maintain conversation topics within the norm of the group. If small talk seems to be the normal thing to do, engage with others to not draw attention to yourself.
While a good understanding of your surroundings is paramount in a disaster, be careful to play down any attempts to scan areas for escape routes or possible problems with security. This type of behavior will be noticed and lead people to question what you’re looking for, or worse, what you’re trying to protect.
The gray man theory relies on not leaving an impression. Eye contact stimulates the brain to form memories so keeping your eyes averted can help you remain unnoticed.
One important skill to learn in adapting a gray man persona is maintaining your privacy without appearing overly private or obviously standoffish. When speaking with others, keep eye contact to a minimum as someone is more likely to notice you if they look in your eyes. Even brief eye contact when passing on the street can form a connection, making you more memorable than those around you.
How You Move
Knowing the local landscape can be a tremendous advantage as the better you know local streets and landmarks, the better able you will be to navigate them and alter your route to avoid troublesome areas. When moving, appear as much as possible to go with the flow, walking with purpose but not urgency. Any rapid motion will draw attention to you and raise suspicions as to your motives.
An integral part of the gray man theory is the ability to move through a crowd without drawing attention to yourself.
When navigating a crowd, make gradual progress – cutting through a sea of people at sharp angles will draw attention to your movements and make you appear suspicious. Whether others perceive you as a savior or threat, either one can slow you down.
Unless it would impede your own safety, always appear to follow the herd. For instance, if everyone around you turns towards an explosive sound and gasps, join them. You don’t ever want to be the one person who is unaffected by an out-of-the-ordinary event.
Follow the focus of the crowd – notice the woman standing with her back turned? According to the gray man theory, in a SHTF scenario, this behavior could raise suspicion. Photo via Intel Free Press on Flickr.
If you need to break away from the crowd, try and make your exit alongside a small group of people, keeping enough distance so that they know you’re not with them but close enough that you don’t appear to be alone, which makes you appear less vulnerable.
When observing your surroundings, be as discreet as possible. Leverage your peripheral vision as well as decoy objects, such as a piece of paper, to give the impression your attention is focused on the object as you survey the area. If appropriate, wear reflective sunglasses that hide your eyes, allowing you the freedom to scan rapidly without drawing attention.
Sunglasses on a sunny day are a good choice for obscuring your face. At night, they would have the opposite effect, drawing attention as something out of the norm.
If you need to engage in activities that will make noise and draw attention your way, try to take advantage of predictable noises to help mask the sound of any breaching you may need to do. Predictable noises include ‘white’ noises that people are accustomed to hearing and therefore raise little suspicion.
You can take advantage of distractions to make small moves toward your destination.
For instance, wait for a loud bus to pass before climbing into a dumpster or synchronize busting a window with a loud siren. If you need to get into a building, choose a door near a noisy HVAC condenser. These preparations may take a little bit of extra time to execute, but those few moments of patience will ensure your activities go unnoticed and may save your life.
How You Look
It goes without saying that when trying to appear less prepared than you are, camo prints or other outwardly tactical-looking clothing are not the best choice, unless of course, you are in a situation where that type of dress is the norm, such as a hunting trip.
While you don’t have to dress head-to-toe in gray, subtle color choices blend best into crowds and make it easier for you to move unnoticed.
Which is the first person that you notice? Bright colors are easy to track through a crowd.
Ideally, you will want to keep any tactical gear concealed. This means packing your pockets and bags strategically to allow for quick access to key items. Reflective objects and bright colors will draw visual attention so ensure items such as your knife are tucked inside your clothing or bag, not hanging from your belt.
Avoid having any reflective materials or highly visible colors on your clothing and accessories, as well as any large text or memorable insignia. Any focal points can draw attention to you and hinder your attempts to blend in.
Even if this officer were in civilian clothing, the shiny handcuffs and holster would be highly visible and leave an impression on passersby.
If possible, carry an additional item with you that can instantly change your look, such as a hat, sunglasses, or jacket, as this can be quite helpful. If someone does happen to peg you as a target, you can use the item to slip under their radar as they scan for you in a crowd.
One last word of caution – be mindful of the way you smell. Yes, smell. Believe it or not, scent is a major memory trigger, so try not to have a noticeable scent about you when trying to blend in.
How You Carry Your Gear and What You Carry
The simplest solution to carrying your gear unnoticed is to find a discreet every day carry bag that blends well with your typical daily routine. Backpacks and messenger bags commonly seen on commuters are good choices as these tend to be less obvious. You can also find pocketbooks with compartmentalized interiors that can make it quick and easy to access your gear.
There are many options for a tactical bag with a low profile that can fit into your typical style without drawing attention.
Another good choice that lends itself well to blending is a jacket or vest with a streetwear outward appearance but hidden storage on the inside. Pants with pockets, especially cargo pants, are excellent for storing gear but may not be the most appropriate choice for people who work in an office with a formal dress code.
The gear you carry with you daily should also be discreet if you want to be a gray man. For example, for self-defense, you may opt for a tactical pen or a discreet folding knife such as the Boker Subcom folding knife, which can even double as a money clip.
A compact flashlight such as the Fenix E05 is so compact it can easily be carried on a keychain without attracting.
Conclusion
In the immediate aftermath of a disaster or in a post-apocalyptic scenario, the ability to conceal yourself as a gray man can be an extremely useful survival skill. The last thing you want is for all your time and effort put into prepping to be for naught by having your supplies taken off you by someone less prepared and more desperate.
To improve your gray man abilities, observe the way people dress and act as you go about your day – what stands out, what makes various people noticeable? This can help you hone in on the objects and behaviors that draw attention.
Combining this knowledge with the four key steps to becoming a gray man will put you well on your way to being able to ‘disappear’ into any crowd and increase your chances of survival when disaster strikes.
Your Thoughts
Do you have any thoughts on the gray man theory? Have you experienced a situation where you needed to conceal your preparedness? Let us know your thoughts and experiences in the comments. Thanks!
We recently published a great article that provided tips for building shelter in any survival situation, which we highly recommend that you read and familiarize yourself with. However, while learning to build shelter from found materials is a skill we feel everyone should have, there are also many advantages to carrying a tent with you for excursions into the wilderness.
Having a tent saves the effort and time of preparing shelter from scratch – allotting you more energy to expend on other aspects of your camp – and can provide life-saving shelter in cases of extreme weather or ready-made shelter when bugging out at night.
Whether for backpacking, recreation, or bugging out in a disaster, having a tent on-hand can be indispensable. However, especially in disaster scenarios, size matters: the smaller and more lightweight your tent, the better. In the case of your bug-out bag, not only are you looking for gear that is light enough to be carried over long distances, but also that doesn’t take up so much room that other survival essentials are left behind.
What is ‘lightweight’? Generally, for a one-person tent, it can be as light as a few pounds, with anything up to approximately seven pounds still considered lightweight.
Choosing the Best Lightweight Tent – Features to Look for
When choosing the best lightweight tent, there are generally two features that are must haves: weatherproof and waterproof; and ease of set-up.
Weatherproof and Waterproof
All it takes is one night out in a torrential downpour to learn the importance of having a lightweight tent that is also properly fitted to withstand the elements. To ensure a lightweight survival tent that is sure to shield you from the elements, we recommend using a bathtub bottom, extra tarp, protected seams, and a rainfly.
Click the image to see the best price for the Hilleberg Janu and user reviews on Amazon.
Bathtub Bottom
When I purchased my first survival tent, the key feature I looked for was size to accommodate the large group I was camping with in the northeastern U.S. during the summer. I soon regretted focusing on size and not looking into different fabrics and sealing methods as we were hit by thunderstorms on three out of three trips. Even with a tarp underneath the tent, the interior floor was soaked.
Learn from my mistake: the best lightweight tents will come with a bathtub bottom – a bathtub-like floor that extends several inches up the sides of the tent before attaching to the walls, ensuring no seams are sitting on the ground. The bottom panel is also treated with a chemical water sealant (typically polyurethane) to lock out moisture.
Click the image to see the best price for the Morrison Mountainsmith and user reviews on Amazon.
Extra Tarp
Even if you’ve purchased the absolute best lightweight tent, it is still advisable to bring along an extra footprint tarp that can be laid under your tent to protect from punctures that can result from roots, sticks, and rocks.
Most bug-out or survival tents will generally come with a custom-sized tarp, but if yours doesn’t, simply use a regular tarp and tuck the edges an inch or so inside the perimeter of the tent. Remember that if the ground cloth extends beyond the edge of the tent, rain water can collect and be driven between the tarp and the tent; it’s always best to let rain roll off your tent straight onto the ground.
Protected Seams
When looking for seams that will keep out the elements, folded seams with double stitching are much more durable and effective at keeping out water than single seams. Additionally, taped seams provide extra strength and protection as they have an extra layer of fabric sewn into the seams.
To further protect your seams from the elements, pretreat them with water sealant. Set up your tent outside on a dry, sunny day and treat all seams by applying water sealant to all threads both inside and outside (including those along doors and on the rainfly), allowing all seams several hours to thoroughly dry and then repeating the treatment. For optimal performance, apply water sealant annually.
Tent Seam Sealants
Gear Aid Seam Sure
Coghlans Seam Seal
Silnet Silicone Seam Sealer
Coleman Seam Sealer
Kenyon Seam Sealer #3 - 4 Pack
Aqua Seal Water-Based Seam Sealer
Click the images to view current pricing on Amazon.
To test your seams to see if they are watertight, simply give them a pull: if tension is created on the seam and you can see light coming through the stitching holes, the seam is not watertight.
Rainfly
Most double-walled survival tents will come with a coordinated rainfly that can be drawn back to provide access to the tent. Choosing a lightweight tent with a rainfly is a simple and easy way of ensuring weather and waterproofing.
Ease of Set-Up
The best way to ensure that you will be able to quickly and easily assemble your lightweight tent in all manner of situations is to actually go out and practice! You don’t ever want to find yourself in a camping or (especially) survival situation without having practised setting up your tent.
While practice makes perfect, there are certain features that will make your survival tent easier to carry and set-up, including poles, stakes, stake loops, and guylines.
Poles
Generally, when looking for the best lightweight tent, your choices for poles will be between aluminum, fiberglass, or no poles. For backpacking and survival we recommend aluminum tent poles over fiberglass as they tend to be stronger, weigh less, and be easier to repair.
Aluminum is a stronger material than fiberglass, necessitating less to achieve the same strength; the added weight of fiberglass will be miniscule when camping in the backyard, but extremely important when heading for the hills with your BOB where every ounce counts.
Additionally, aluminum can be easier to repair than fiberglass. When fiberglass fractures, it can tear your tent and does not lend itself easily to repairs; if your fiberglass pole breaks, it will most likely need to be replaced. Conversely, aluminum will typically bend before it snaps, giving you more of a chance to perform long-lasting repairs – an advantage that is crucial for long-term survival.
There are, however, advantages to using fiberglass poles. For one, fiberglass does not corrode, whereas aluminum poles will – although they can be treated with anti-corrosive coating, it will eventually wear off, especially in wet climates. Also, fiberglass is typically priced a little lower than aluminum.
Stakes, Stake Loops, and Guylines
For anyone who has ever been camping, you know that it doesn’t take much of a breeze to send your tent rolling through the trees, potentially ripping or breaking it. Stakes are what keep your tent from blowing around and are an essential part of your tent shelter kit; using them properly can very literally mean the difference between a secure shelter and losing your tent completely in a survival situation. Choosing the right stakes for your survival tent can be equally as important as choosing the best lightweight tent.
Stakes should be driven into the ground at a slight angle, away from the direction of force of the line. Ultralight titanium stakes get the job done at 0.2 oz. apiece, but are likely to loosen in soft or loose terrain. Although they are quite thin, they are less susceptible to bending when hammered into place. Aluminum stakes are a sturdy option and can handle more abuse while being driven into the ground; however, they are also heavier to carry around. Steel stakes are the heaviest, weighing about an ounce apiece but are also heavy duty.
The shape of the stake will also have an effect on how easy it is to drive in and how well it stays put. If you find yourself in loose soil or sand, there are Y-beam and ‘V’ stakes that work well in these conditions and come in plastic or aluminum varieties. If you’re expecting snow, a curved stake with holes in it goes in easily and freezes in place.
Click the images to view current pricing on Amazon.
If you happen to find yourself on extremely rocky ground or without stakes at all, there is always the “big rock, little rock” method that you can use, as seen in the video below:
A final point to consider is how your tent will anchor to the stakes. Most tents will have nylon webbing loops at the base corners and sometimes midway up each side, as well as on the rainfly. These loops attach either directly to stakes or to guylines then to the stakes, to secure your tent and help keep its shape.
Depending on what type of stake you are using, you may wish to tie small loops of paracord to the webbing in order to better grip the stakes. Paracord is an excellent choice for long-term use as it has a high propensity for withstanding fraying due to friction. Measure out the amount of paracord you will need for your tent and pack that amount right in your tent bag, so that it will be available quickly in a bug-out situation.
Additional Considerations For Choosing The Best Lightweight Tent
When selecting the best lightweight tent, especially for survival scenarios, in addition to the features covered above, you will also want to consider the amount of vestibules and storage pouches, shape, and color.
Vestibules and Storage Pouches
Having extra storage space can be a huge advantage – especially if you intend on bugging out for a long period of time – but is not as crucial as some other features. If your lightweight tent comes with plenty of storage space, great, but don’t add unneeded weight simply to try to fit in better storage.
A-frame tents will typically have a vestibule at either end while dome-shaped tents will usually have a rainfly that extends beyond the entrance to create a small, sheltered space.
The interior of your tent may contain mesh pockets for holding smaller gear, such as flashlights and multitools, which allow you to keep these important tools at-hand and available when you need them. Another useful feature you may look for in your tent is a loop at the apex, which is perfect for hanging a lantern from a caribiner to illuminate your tent at night.
Shape
Generally, there are two shapes your tent will come in: A-frame and dome. The biggest drawback of an A-frame tent is the lack of headroom allotted along the sides. How big of an inconvenience this is depends on the number of occupants; for a single-person tent, this is much less of a concern than for an entire family.
Dome shaped tents tend to have a square footprint and therefore allow for more vertical space close to the sides, making them an excellent choice when there are multiple people needing to fit inside. Additionally, domes provide slightly better weatherproofing as rain sheds more easily and wind passes over more smoothly due to their aerodynamic shape; however, these advantages diminish the larger the dome as surface area becomes a factor.
Click the image to see the Mountainsmith Genesee and user reviews on Amazon.
Color
In most situations, the color of your tent will have little to no effect on its performance; however, keep in mind that dark colors (which absorb more light energy) can raise interior temperatures (beneficial in cold climates while detrimental in excessive heat), and bright colors (such as yellow or orange) do not blend well with natural landscapes and can be easily spotted (if staying hidden is a priority, choose earth tones or camouflage patterns).
Capacity
Your choice of capacity will depend on your needs. Generally, the manufacturer will state the maximum number of sleep pads that can fit the footprint of the tent. This makes for a cozy but comfortable fit. Taller people or those with a larger build may benefit from going for one size larger than the actual number of people the tent is intended for, or going with an A-frame style which tends to be longer.
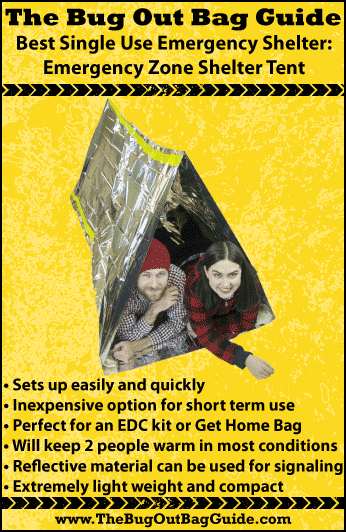
Additionally, if you are looking for options for a get-home bag, there is no need to lug around anything larger than a one-person tent. In the summer or as a back-up, a simple single use mylar shelter may suffice.
Click to see the Emergency Shelter Tent and user reviews on Amazon.
If you live in an area where low temperatures and precipitation are a regular occurrence, you may choose to upgrade to a full one-person tent. This is especially useful not only in harsh weather conditions but also if your journey lasts more than one night. Mylar shelters are not intended for repeated use but a one-person tent can easily be taken down, re-packed, and set-up again.
Click to see the Snugpack Ionosphere and user reviews on Amazon.
Our Top Picks For Best Lightweight Tent
Lightweight Tents
Key Features
Capacity
Ideal For
Weight
High Peak Outdoors Maxxlite Tent
• Bathtub bottom seals out rain and snow
• Aluminum poles offer structure
• Rain cover forms a vestibule at either end to store gear
2
Cold weather
Rain, snow
6.70 lbs
Emergency Shelter Tent
• Include attached paracord for easy set up
• Doubles as a survival blanket
• Dual mylar layering is tough and insultating
2
First aid
Day hikes
0.50 lbs
Eureka! Timberline 4 Tent
• Well-ventilated with windows that are hooded by the rain fly
• Interior mesh pockets, loops, and gear loft for storage
• Weight to size ratio makes it a good choice for a family of 4
4
Families
3 season backpacking
7.81 lbs
Snugpak Ionosphere 1 Person Tent
• Slim 20" x 6" bundle easily fits into most packs
• Quick and easy to set up and take down, includes aluminum stakes
• Fits one person plus a good sized pack
1
Long-term use
Moderate temperatures
3.34 lbs
Mountainsmith Morrison 2 Person 3 Season Tent
• Bathtub floor with taped seams keep out the rain
• Rainfly creates additional 14 sq ft vestibule
• Aluminum "V" stakes stay put in a variety of terrains
• Includes reflective guylines with tension adjusters
2
Rainy or windy climates
3 season backpacking
4.69 lbs
Wenzel Alpine 3 Person Tent
• Weather Armor polyester fabric seals out the elements
• Bathtub bottom with mud mat to keep interior clean
• Fiberglass poles
3
Small families
Economical option
8.00 lbs
Mountainsmith Genesee 3 Season Tent
• Fully enclosed rainfly with protected top vents
• Superfine mesh keeps out insects
• Reflective guy lines include plastic tighteners
4
Families
Windy and rainy climates
6.56 lbs
Hilleberg Jannu 2 Person Tent
• Low profile is effective at shedding sleet and snow
• Strong side wall and frame stand up to high winds
• Asymetric vestibule protects entryway and decreases draft
• Well worth the price for alpine camping
2
Harsh winter conditions
6.81 lbs
EUREKA Apex 2XT Tent
• Double-coated StormShield poylester fly and bathtub bottom to protect against weather
• Rain fly can be rotated 180 degrees for easier set-up
• Inner tent mesh wall provides good ventilation
• Heavy duty Coleman fiberglass frame is freestanding (do not have to thread through fabric sleeve)
2
3 season backpacking
5.75 lbs
Click the images to view current pricing on Amazon.
Conclusion
Carrying a lightweight tent that offers an immediate shelter option can provide a real advantage over scrounging to find materials to build shelter, especially in the dark or harsh weather. However, trekking with a survival tent the many hours (or days) that may be needed in a bug-out scenario could prove extremely tiresome; for this reason, it is imperative that if you are going to pack a bug-out tent, pack one that is lightweight and therefore easy to carry across long distances.
Additionally, the less weight and space taken up by your tent, the more room left for you to pack other essential items you will need while bugging out.
When choosing the best lightweight tent for your needs, size and portability will always be your primary concerns. Secondary considerations should be the tent’s ability to stand up to the elements and how easy it is to set up. Additionally, look for vestibules and storage pouches, the best shape for your needs (A-frame vs. dome), the color that will perform best in your situation, and the desired capacity.
Your Thoughts
Do you think a lightweight tent is worth the extra weight in your bug-out bag and/or get-home bag? Do you have any tips or gear suggestions that have made it easier for you to set up a tent? Share your thoughts in the Comments section below, thanks!